0x00 前言
Warden 框架默认实现了两种负载均衡算法:
- WRR:Weight Round Robin(Dynamic)
- P2C:Power of Two Choice
之前的文章Kratos源码分析:分析 Kratos 中的 Dynamic-Wrr 负载均衡算法的实现,简单分析了WRR算法的实现思路及解决的场景。那么WRR算法存在哪些问题呢?
从B站的实践经验来看,动态感知的 WRR 算法,利用每次 RPC 请求返回的 Response 夹带 CPU 使用率,尽可能感知到服务负载,并且每隔一段时间整体调整一次节点的权重分数,虽然解决了原生WRR的权重固定的问题,但是存在羊群效应问题:“发现其实是信息滞后和分布式带来的羊群效应”,即
就是WRR版本的负载均衡算法虽然会自动刷新权重值,但是在刷新时无法做到完全的实时,再快也不可能超过一个 RTT,都会存在一些信息延迟差。当后台资源比较稀缺时,遇到网络抖动时,就可能会把该节点炸掉,但是在监控上面是感觉不到的,因为 CPU 已经被平均掉了。
从上面的描述看,问题的本质在于gRPC的负载均衡是在客户端实现的,客户端每次请求完获取到服务端CPU数据,可能会存在延迟,在延迟的空档期,大量请求涌入,导致某个后端Node接收大量请求,从而不可用的问题。
WRR (Weighted Round Robin)
该算法在加权轮询法基础上增加了动态调节权重值,用户可以在为每一个节点先配置一个初始的权重分,之后算法会根据节点 cpu、延迟、服务端错误率、客户端错误率动态打分,在将打分乘用户自定义的初始权重分得到最后的权重值
0x01 P2C 算法介绍
Power of Two Choices (P2C,两次随机选择) 负载均衡算法,主要用于为每个 RPC 请求返回一个 Server 节点以供调用,该算法策略出自论文 《The Power of Two Random Choices: A Survey of Techniques and Results》 ,主要思路如下:
- 从可用后端节点列表中做
2次选择操作(随机算法 or 依据一定策略来选择),得到节点nodeA、nodeB - 比较
nodeA、nodeB两个节点,选出负载最低(一般是正在处理的连接数 / 请求数最少)的节点作为被选中的节点
伪代码如下:
nodeA = random_choice(nodes)
nodeB = random_choice(nodes)
best = least_connection_choice([nodeA, nodeB])
此外,有几篇详细的算法实践的文章推荐阅读下:
- 来自 HAPROXY 的 Test Driving Power of Two Random Choices Load Balancing
- The power of two random choices
相比WRR负载均衡算法,P2C算法通过随机选择两个节点后在这俩节点里选择优胜者来避免羊群效应,并通过指数加权移动平均算法统计服务端的实时状态,从而做出最优选择
0x02 思考
既然 gRPC 的负载均衡的算法是在客户端实现的,那么如何设计一款好的负载均衡算法?
- 默认情况下(HTTP2)每个 gRPC-Client 都维护这与
N个后端 gRPC-Server 的长连接 N个后端服务节点,初始化有一个权重值,每次调用 RPC 方法前,先根据算法打分,权重高的后端被选择用于本次 RPC 过程,那么如何调整权重值?有几个维度需要关心的- gRPC-Client 实时根据当前的后端服务端节点的负载动态调整权重:考虑服务端的 CPU(区间采样,如何消除毛刺?)、内存信息
- gRPC-Client 本身记录当前并发的(积压)RPC 请求
- gRPC-Client 每次完成 RPC 请求,记录到这个后端服务节点的 latency(延迟)
- gRPC-Client 累计的请求失败率、服务端失败率(不同视角)
- 考虑 RPC 失败后的 retry 重试逻辑
- 考虑客户端 gRPC-Client 在收到服务端 gRPC-Server 的指标信息的滞后(客户端接收服务端指标数据可能有延迟的场景)
这些点和疑问,在阅读 Warden 负载均衡的算法时,都得到了解答
前置基础知识
- 如何估算服务器的负载?
0x03 P2C 实现
官方的文档 上给出了实现的一些关键细节,先列举下,然后再结合代码做下分析:
P2C (Pick of two choices) 算法描述
本算法通过随机选择两个 node 选择优胜者来避免羊群效应,并通过 EWMA 尽量获取服务端的实时状态
针对 服务端 的指标:
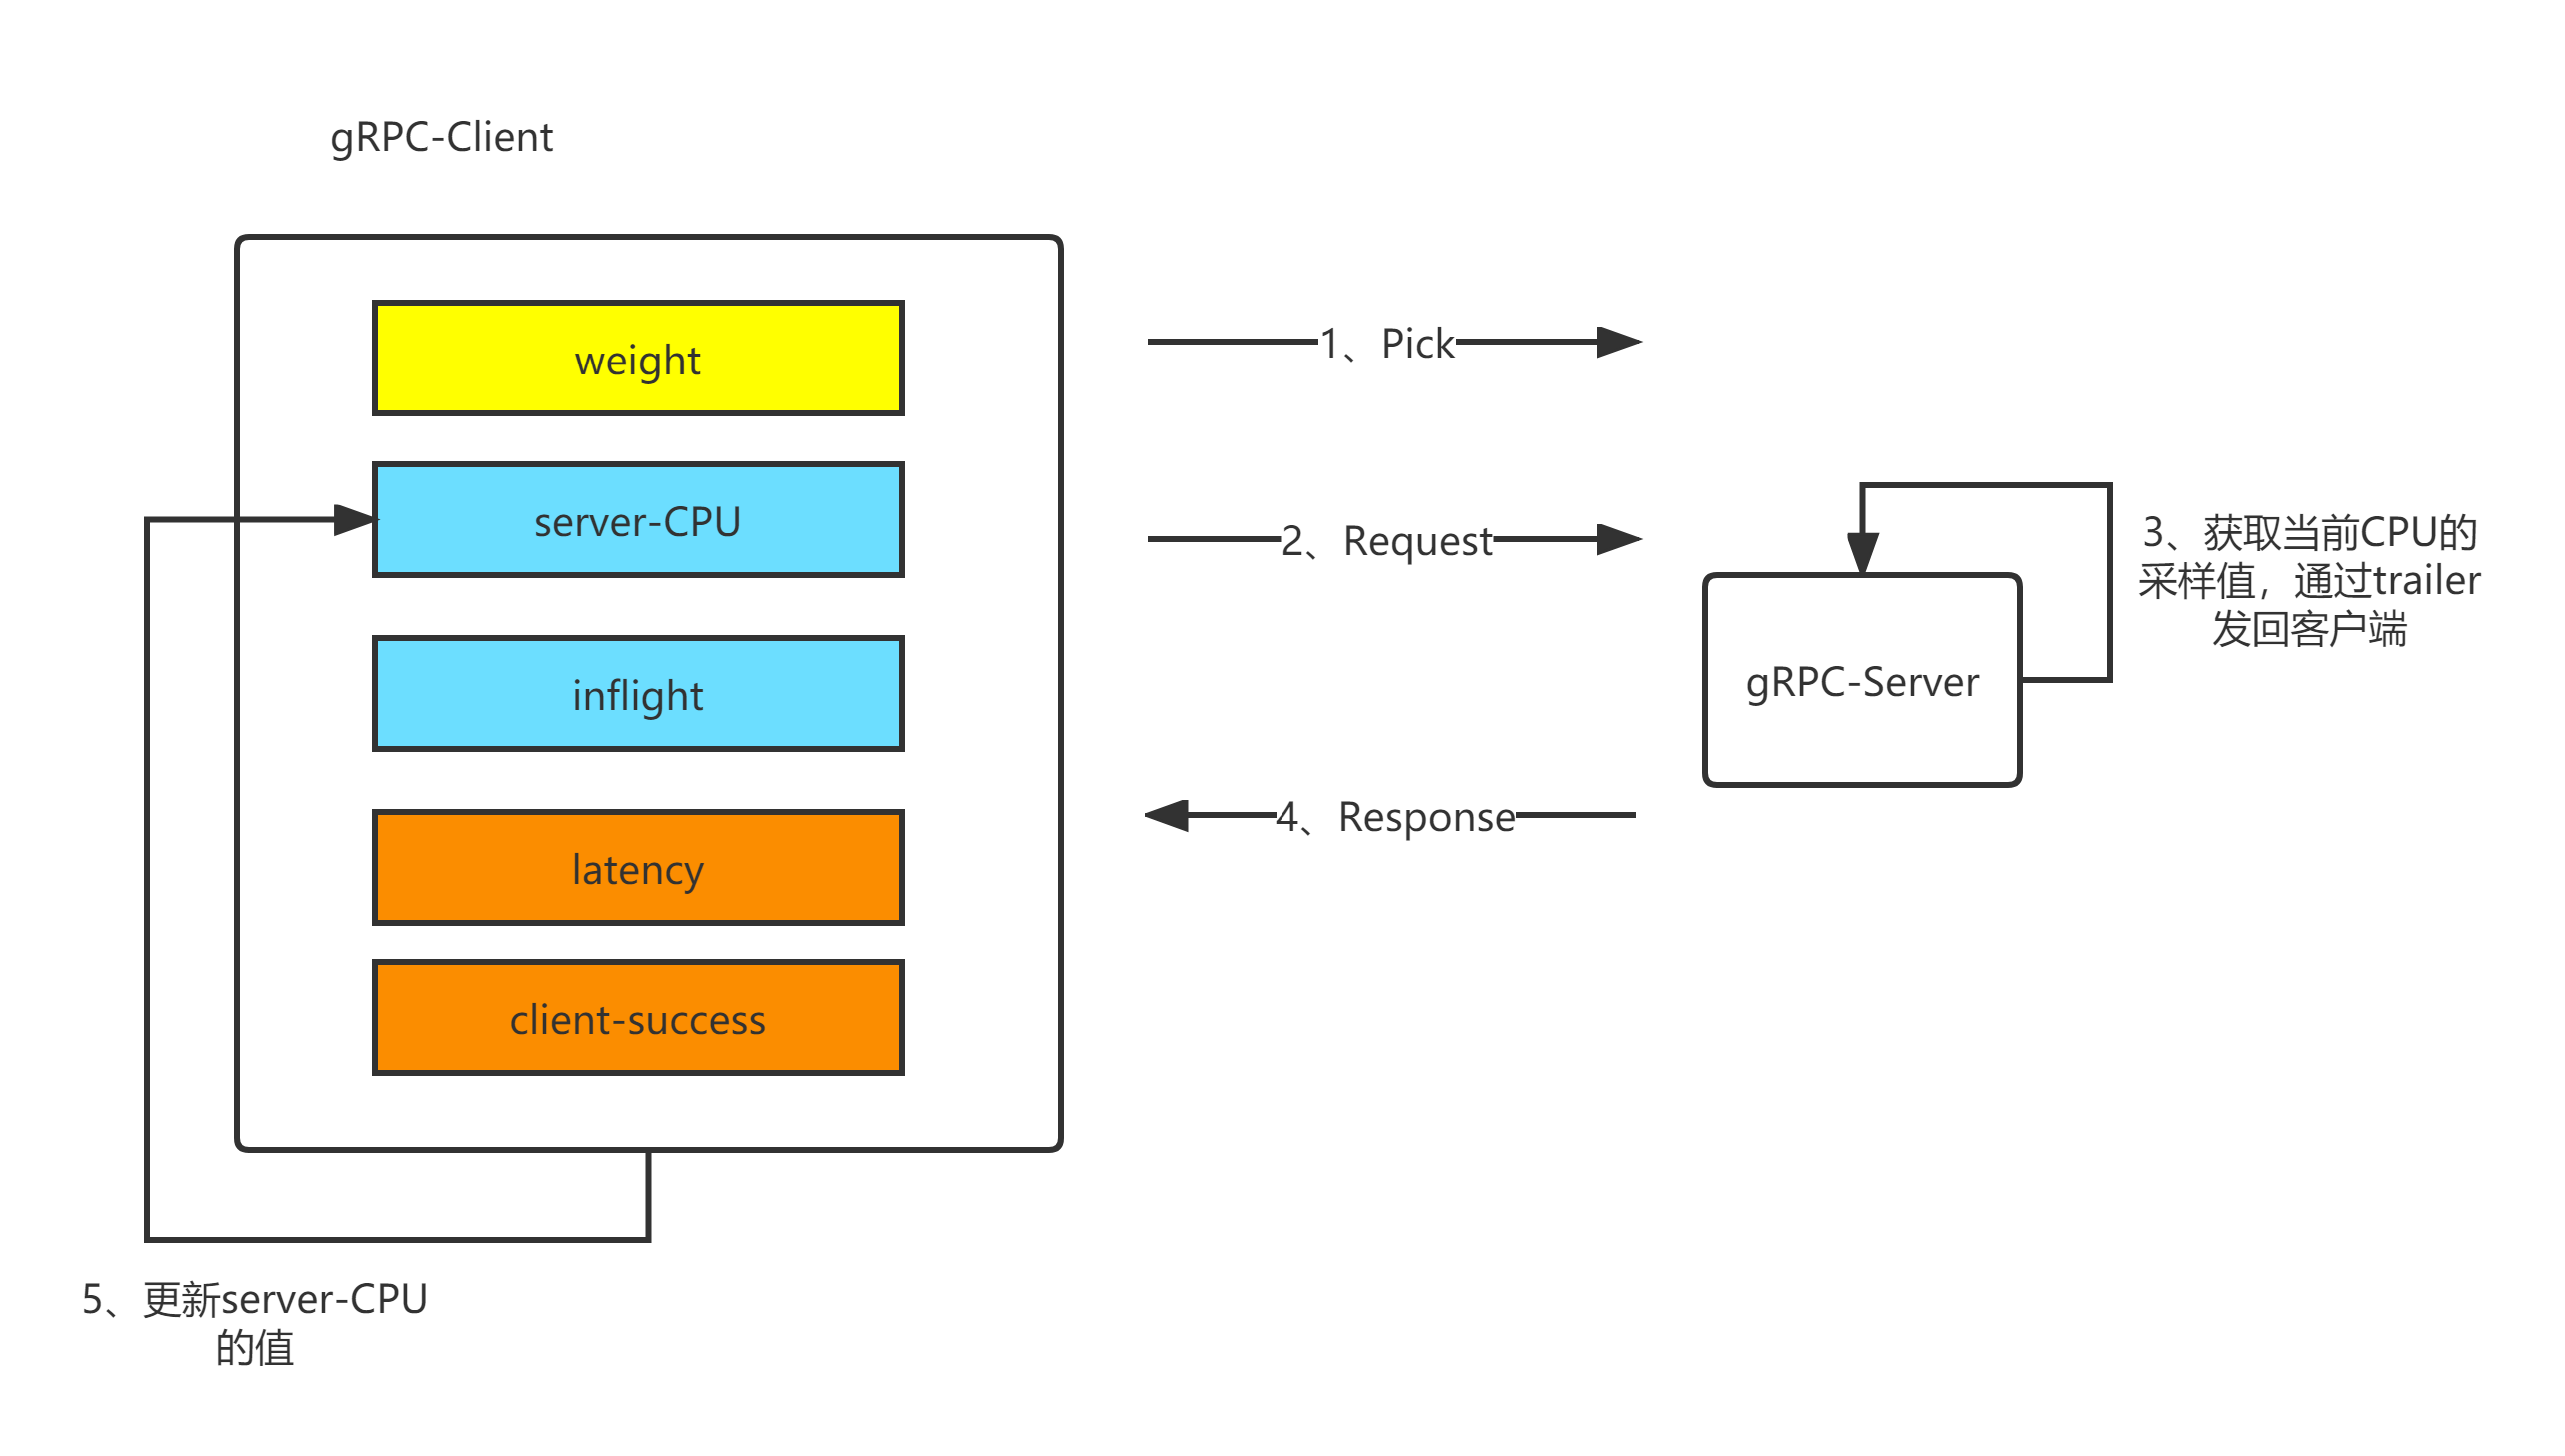
服务端获取最近 500ms 内的 CPU 使用率(针对容器场景:需要将 cgroup 设置的限制考虑进去,并除以 CPU 核心数),并将 CPU 使用率乘以 1000 后塞入每次 gRPC 请求中的的 Trailer 中夹带返回
针对 客户端 的指标,主要参数如下:
- server_cpu:通过每次请求中服务端塞在 trailer 中的 cpu_usage 拿到服务端最近
500ms内的 cpu 使用率 - inflight:当前客户端正在发送并等待 response 的请求数(pending request)
- latency: 加权移动平均算法计算出的接口延迟
- client_success: 加权移动平均算法计算出的请求成功率(只记录 gRPC 内部错误,比如 context deadline)
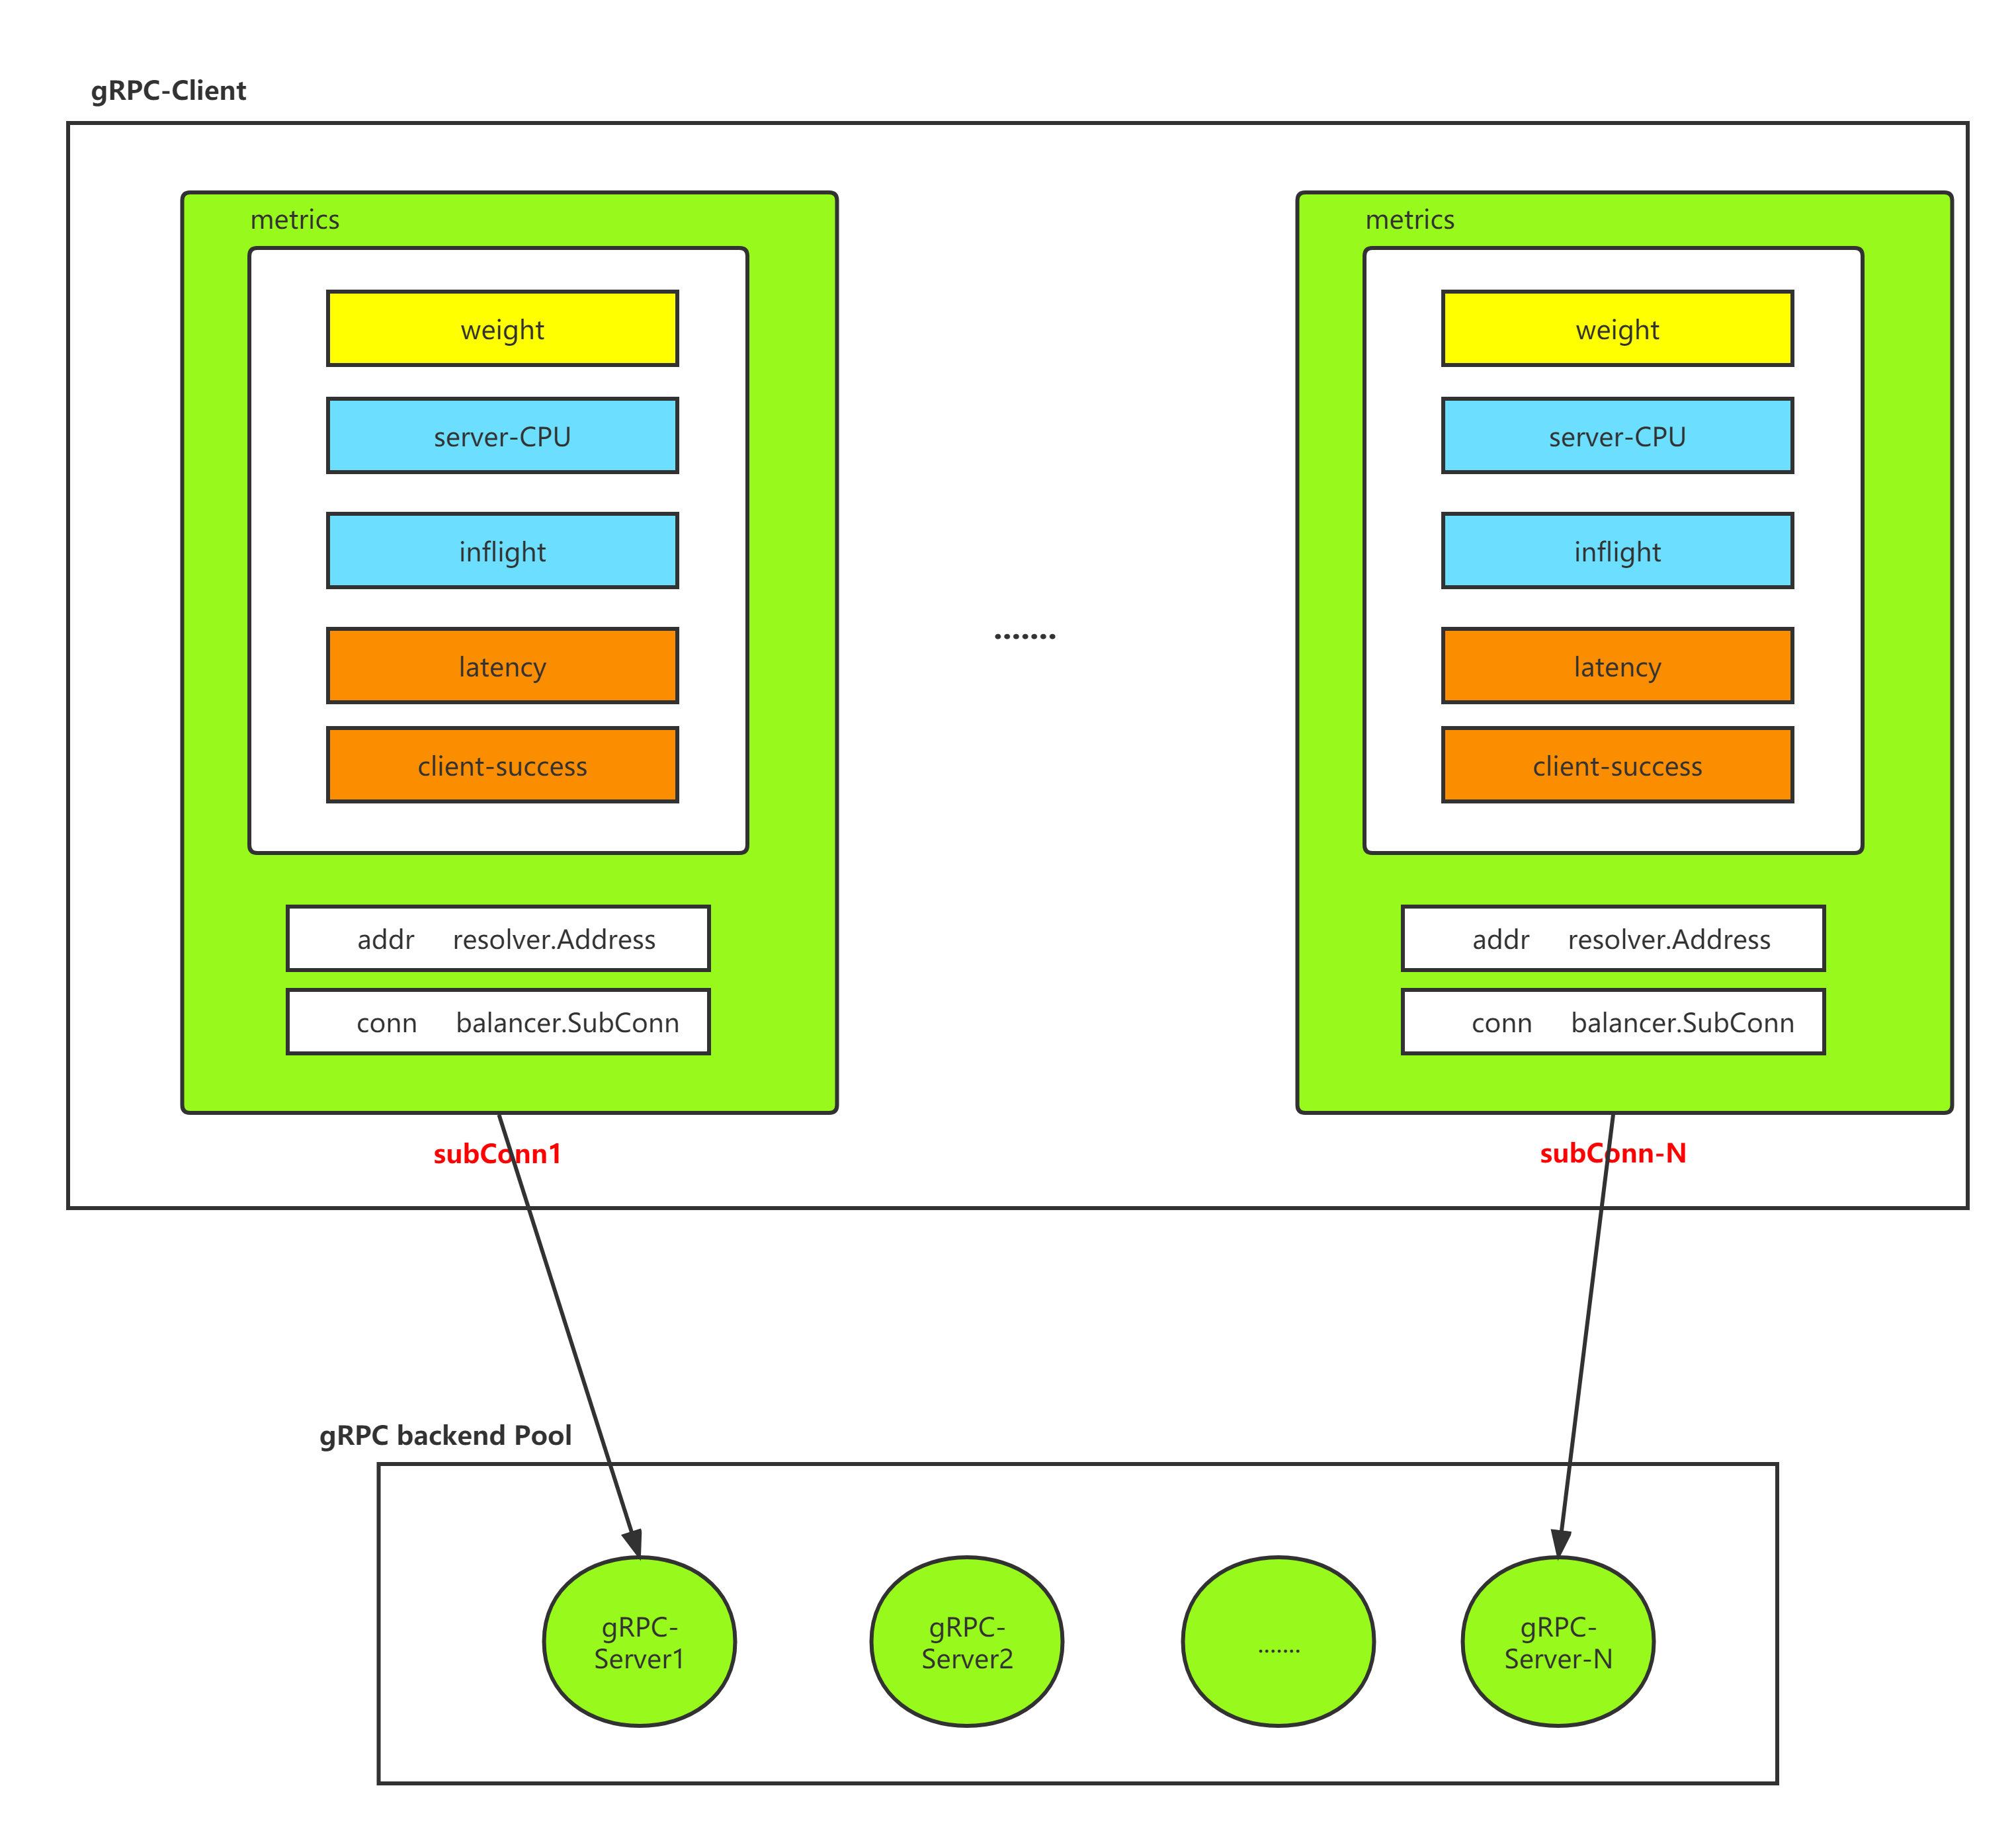
上述服务端与客户端的指标最终都会在客户端呈现(基于客户端的负载均衡策略),如下图,这里对P2C算法中每个Node指标分类:
- weight:常量,每个节点被赋予的权重值,权重越大,越容易被选择到(一般预埋在服务发现配置中下发)
- inflight:代表节点到该Node的请求拥塞度,代表着当前节点到该Node有多少个请求未完成或者正开始请求,每次pick到发送请求前先原子
+1,response后说明一次请求完成,这时再原子-1;当前线程获取到的inflight瞬间值,就是在这个时段的拥塞度,比如一个节点如果很闲,响应速度也快,那么它的拥塞度肯定极低 - server_cpu:由Node回写给客户端
- latency:只针对该Node(服务端)的所有请求,按照EWMA算法得到,常规意义为客户端到该Node的所有请求延迟总和/请求总数
- client_success:同样只针对该Node(服务端)的所有请求,按照EWMA算法得到,常规意义为客户端到该Node的所有成功请求总和/请求总数

由上图过程易知,相比普通的random算法,它是随机选择两个node,然后比较它们的负载率,然后选出当前负载率最小的node,负载率是根据上面5个指标共同计算出来的
P2C算法中权重计算
在P2C算法中,当通过random方式选出两个Node之后,要通过权重来决定选择哪个Node(参考下文pick()实现代码),这里计算权重的公式如下:
这个公式的含义很直观,对权重有积极影响的因子,如成功率,初始权重等,位于分子;对权重有消极影响的因子,如cpu负载(过高)、lag延迟(过大)、以及积压的请求数inflight,放在分母的位置(为了防止除法溢出,inflight做了加1处理)
EWMA 算法简介
P2C 代码实现中大量使用了 EWMA 算法(指数加权移动平均算法),此算法,是对观察值分别给予不同的权数,按不同权数求得移动平均值,并以最后的移动平均值为基础,确定预测值的方法。采用加权移动平均法,是因为观察期的近期观察值对预测值有较大影响,它更能反映近期变化的趋势。
- 指数移动加权平均法,是指各数值的加权系数随时间呈指数式递减,越靠近当前时刻的数值加权系数就越大
- 指数移动加权平均较传统的平均法来说,一是不需要保存过去所有的数值;二是计算量显著减小
感兴趣的可以阅读这篇文章:指数加权移动平均法(EWMA)
EWMA 算法的修正(预测)公式是:
\[Z_i=w*X_{cur} + (1-w)*Z_{i-1}\]其中,在 P2C 算法中,w 系数按照下面的规则获取:
w := math.Exp(float64(-td) / float64(tau))
预测的方法是,每隔一段时间进行一次采样,每次采样完成之后,就对预测值进行一次修正,这种方法的特点是近期的采样值对预测值的影响大,远期的影响较小。从算法应用场景可知,和 P2C 算法计算场景比较类似,这里针对 p2c.subConn 结构使用 EWMA 算法,只需要保存上一次计算拿到的结果即可
为什么使用EWMA计算latency/client_success?
设想一下,如果通过每次请求,累加总请求数、总耗时、总成功数,然后利用算术平均法更新latency和client_success的值,那么如果偶现网络波动的情况下,由于算术平均不够敏感(相对),这样客户端就无法有效感知网络波动。从另一个角度来讲,算术平均是所有数据的总平均,受过往值的影响非常深,以至于不能很好的反应某个时段的平均趋势

在上图中,β是一个位于[0,1]的值
若β值变大(趋近于1时),后续每个平均值都会受到更多历史均值的影响,而当前耗时仅占很少影响,跟之前的结论一样,β越大,移动窗口越大,当前平均数受到历史平均值的影响就越大。反之如果β值越小,在出现网络抖动后,更缓慢的恢复为正常均值(波形跟算术平均接近),此时平均值轨迹几乎和正常响应时间重叠,所以对于固定的β值:
β值越大,移动平均区间越大,当前平均值的计算受到之前平均值的影响也就越大,能够较好体现平均值,但对网络波动的反应相对迟钝β值越小,移动平均区间越小,当前平均值的计算受到之前平均值的影响也就越小,无法很好的体现出平均值,但对网络波动反应较敏感(因为趋近于真实值)
所以对于负载均衡的场景,需要一个动态的β(支持基于某些因子做动态计算),实时调整β值的意义是,比如EWMA可以在网络波动时适当降低β的值,使其快速感知到网络波动的存在,当网络波动结束后,适当提升β的值,这样就可以在网络稳定的情况下较好的反映一个区段内的均值情况,实现后将达到一种效果:快速感知网络延迟并迅速提高其均值,当网络恢复后,慢慢降回正常水平(均值恢复需要慢慢进行,因为刚恢复的节点稳定性不可信,慢慢恢复到正常水平,以信任其稳定性)
所以,关于β值的计算可以参考牛顿冷却定律(变种):

其中e是常量,Δt表示第t次请求的耗时(假定),k表示衰减系数(注意:Δt和k值成反比),如此这样:
- 当网络抖动时,假设
Δt非常大,即便k值起到中和作用,β值较之前也会明显变小,而1-β变大,这样第t次请求的实际耗时的比重就会增加,满足需求(在网络抖动时,迅速感知抖动延迟) - 当网络恢复时,即使
Δt迅速降低,由于k值的中和(Δt/k的值大小和k值成反比),k越大,β越大,而1-β越小,这样第t次请求之前的平均加权延迟比重增加(均值计算受之前波动期的均值影响越大,曲线恢复越缓慢)
总结下,对于持续请求中的场景,需要的机制是存在网络抖动时快速感知延迟,待抖动恢复时慢慢恢复到正常值
0x04 代码分析
全局变量:
const (
	// The mean lifetime of `cost`, it reaches its half-life after Tau*ln(2)
	// 衰减系数,单位:纳秒(600ms)
	tau = int64(time.Millisecond * 600)
	// if statistic not collected,we add a big penalty to endpoint
	// 惩罚值,单位:纳秒(250ms)
	penalty = uint64(1000 * time.Millisecond * 250)

	// 闲置时间的最大容忍值,单位:纳秒(3s)
	forceGap = int64(time.Second * 3)
)
p2c.subConn,封装了 balancer.SubConn,代表了 Client 到 Server 的一条长连接,封装了核心属性(计算权重需要),其中重要的字段说明如下(牢记一个 subConn 代表了客户端到某个服务端 Node 的唯一属性):
meta:在服务发现(Etcd)中设置的 Node 的初始值lag:请求延迟(用于与下次实现加权计算),加权移动平均算法计算出的请求延迟度success:使用加权算法拿到的客户端 RPC 调用成功率,通过加权移动平均算法计算出的请求成功率(只记录gRPC内部错误,比如context deadline)inflight:当前正在处理的请求数,即当前客户端正在发送给subConn对应的服务端并等待response的请求数(pending request)svrCPU:保存了服务端返回的最近一段时间的 CPU 使用率(即subConn对应服务端的CPU使用率)stamp:保存上次计算权重的时间戳(Nano)
注意lag、success、inflight和svrCPU都是客户端统计数据
gRPC客户端的连接池如下图所示:

type subConn struct {
	// metadata
	conn balancer.SubConn
	addr resolver.Address
	meta wmd.MD

	//client statistic data
	lag      uint64
	success  uint64
	inflight int64
	// server statistic data
	svrCPU uint64

	//last collected timestamp
	stamp int64
	//last pick timestamp
	pick int64
	// request number in a period time
	reqs int64
}
这里特别提一下subConn的pick与stamp字段:
pick:保存了该Node最近被pick的时间戳,利用该值可以统计被选中后,一次请求的耗时stamp:保存了最近一次resp时间戳,作为牛顿冷却算式的因子参与计算(这一点和原文描述有些不太一致)
p2c.subConn 实现的方法:
valid:节点健康度判断health:获取当前长连接中存储的成功率sc.success的值load:服务端负载率估测的值,计算负载的公式是load = svrCPU * Sqrt(EWMA{lag}) * inflight,EWMA{lag}为平均请求耗时,inflight为当前节点正在处理请求的数量,相乘的结果视为当前节点的网络负载,其中对EWMA{lag}的结果取Sqrt是为了降低EWMA{lag}的权重cost:
func (sc *subConn) valid() bool {
	return sc.health()> 500 && atomic.LoadUint64(&sc.svrCPU) < 900
}

func (sc *subConn) health() uint64 {
	return atomic.LoadUint64(&sc.success)
}

func (sc *subConn) load() uint64 {
	// 对ewma的sc.lag开根号
	lag := uint64(math.Sqrt(float64(atomic.LoadUint64(&sc.lag))) + 1)
	//核心!根据cpu使用率、延迟率、拥塞度计算出负载率(估测的subConn对应的服务端Node负载率!!)
	load := atomic.LoadUint64(&sc.svrCPU) * lag * uint64(atomic.LoadInt64(&sc.inflight))
	if load == 0 {
		// 注意:penalty 是初始化没有数据时的惩罚值,默认为 1e9 * 250
		load = penalty
	}
	return load
}

func (sc *subConn) cost() uint64 {
	load := atomic.LoadUint64(&sc.svrCPU) * atomic.LoadUint64(&sc.lag) * uint64(atomic.LoadInt64(&sc.inflight))
	if load == 0 {
		// penalty 是初始化没有数据时的惩罚值,默认为 1e9 * 250
		load = penalty
	}
	return load
}
指标的计算详解-inflight

实现:总体过程
基于gRPC实现的P2C算法的大概流程如下:
1、p2cPickerBuilder.Build:初始化时会调用一次
2、当客户端需要发起请求前,先调用p2cPicker.Pick选择合适的后端subConn,subConn代表在P2C算法中的一条后端长连接,其评分在请求前是固定的,当客户端使用了这条subConn进行请求后,算法会根据当前请求的结果,同时配合服务端的回带字段更新打分值
3、Pick的调用路径为pick()->prePick()->DoneInfo()
pickprePick:尽量选择两个较为健康的节点(node.valid())参与后续决策- 从上面结果(
2个节点),再根据最终评分选出一个合适的 - 选定了某个
subConn,并发送请求 - 请求完成后,利用
balancer.DoneInfo更新当前subConn的指标,可以直接拿到的指标有本次调用结果(是否err)、调用延迟,更新pc.svrCPU、pc.success/pc.lag(通过EWMA计算),其他字段如pc.stamp、pc.stamp、pc.pick的更新参考实现(有条件)
简言之,负载均衡策略选择的时候是基于已有记录(上一次请求结束后更新的指标)直接算出被选中的节点,被选中节点Node在完成RPC请求后,更新本Node的各项原子指标
pick多节点比较细节
注意到pick函数中(多Node场景处理)有下面的代码,若前者计算值较大则选前者,反之选择后者,其实对应的原始公式应该是下面(代码转换为乘法了),对应前文中的权重计算公式
*        nodeA.load                           nodeB.load
* ----------------------------   :   ----------------------------
* nodeA.health * nodeA.weight        nodeB.health * nodeB.weight
从上面的公式易知,health和weight为提权用,而load值(Node负载)为降权用,所以用load值除以health和weight的乘积,计算出的值越大,越不容易被pick
if nodeA.load()*nodeB.health()*nodeB.meta.Weight > nodeB.load()*nodeA.health()*nodeA.meta.Weight {
	//pc 为本次算法选择的节点
	pc, upc = nodeB, nodeA
} else {
	pc, upc = nodeA, nodeB
}
LB 核心逻辑 – Builder
p2cPickerBuilder.Build 在每次后端节点有增减的情况下调用,初始化时会调用一次,readySCs 保存了后端服务器的基础信息,从代码实现上看,也是做了对节点的初始化工作:
当后端有删减时,也会强制把已存在的后端节点进行初始化(感觉这一点,gRPC 不是很友好):
这里后端的初始化数据为
svrCPU:500lag:0success:1000inflight:1
type p2cPickerBuilder struct{}

func (*p2cPickerBuilder) Build(readySCs map[resolver.Address]balancer.SubConn) balancer.Picker {
	p := &p2cPicker{
		colors: make(map[string]*p2cPicker),
		// 初始化 rand 种子
		r: rand.New(rand.NewSource(time.Now().UnixNano())),
	}

	// 初始化后端的权重数据
	for addr, sc := range readySCs {
		fmt.Println("[p2cPickerBuilder.Builder]init:",addr,sc)
		meta, ok := addr.Metadata.(wmd.MD)
		if !ok {
			meta = wmd.MD{
				Weight: 10,
			}
		}
		subc := &subConn{
			conn: sc,
			addr: addr,
			meta: meta,

			svrCPU:   500,
			lag:      0,
			success:  1000,
			inflight: 1,
		}
		if meta.Color == "" {
			p.subConns = append(p.subConns, subc)
			continue
		}
		// if color not empty, use color picker
		// 如果服务端定义了 color 筛选,则启动 color 的选择逻辑(测试时没用)
		cp, ok := p.colors[meta.Color]
		if !ok {
			cp = &p2cPicker{r: rand.New(rand.NewSource(time.Now().UnixNano()))}
			p.colors[meta.Color] = cp
		}
		cp.subConns = append(cp.subConns, subc)
	}
	return p
}
LB 核心逻辑 - Picker
p2c.Picker 实现了负载均衡的选择逻辑:
Pick:主方法入口- 先调用
prePick,选择两个随机的 node - 最后从上一步的 node 列表中选取一个合适的 node,返回其对应的
subConn,执行 RPC 请求 - 根据RPC请求结果及 node 回带的服务端 CPU 字段信息,更新本
subConn的核心因子信息stampsuccesslag
p2cPicker 结构:
type p2cPicker struct {
	// subConns is the snapshot of the weighted-roundrobin balancer when this picker was
	// created. The slice is immutable. Each Get() will do a round robin
	// selection from it and return the selected SubConn.
	subConns []*subConn		// 保存所有的后端
	colors   map[string]*p2cPicker
	logTs    int64		//
	r        *rand.Rand
	lk       sync.Mutex
}
接下来着重分析下 pick 和 prePick 方法:
prePick 方法,实现了随机选择的逻辑,总循环 3 次,随机从 subConns []*subConn 中选择两个节点 nodeB 和 nodeA,如果满足 node.valid() 的要求,直接返回,不满足的话,返回最后一次的选择的两个节点:
注意返回值中的 nodeA 和 nodeB 都是 subConn 结构
// choose two distinct nodes
func (p *p2cPicker) prePick() (nodeA *subConn, nodeB *subConn) {
	for i := 0; i < 3; i++ {
		p.lk.Lock()
		a := p.r.Intn(len(p.subConns))
		b := p.r.Intn(len(p.subConns) - 1)
		p.lk.Unlock()
		if b >= a {
			// 防止随机出的节点相同
			b = b + 1
		}
		nodeA, nodeB = p.subConns[a], p.subConns[b]
		if nodeA.valid() || nodeB.valid() {
			// 节点健康度简单筛选
			break
		}
	}
	return
}
picker 的实现如下,重要部分已加了注释,需要关注的有如下几点信息:
DoneInfo()是在 RPC 方法执行完成后的回调,主要用于在 gRPC 的Trailer返回的pc对应的服务端 CPU 信息,根据此 CPU 信息,更新pc这个subConn的相关信息- 计算权重分数的方法,每次请求来时都会更新延迟,并且把之前获得的时间延迟进行权重的衰减,新获得的时间提高权重,这样就实现了滚动更新
func (p *p2cPicker) Pick(ctx context.Context, opts balancer.PickInfo) (balancer.SubConn, func(balancer.DoneInfo), error) {
	// FIXME refactor to unify the color logic
	color := nmd.String(ctx, nmd.Color)
	if color == ""&& env.Color !="" {
		color = env.Color
	}
	if color != "" {
		if cp, ok := p.colors[color]; ok {
			return cp.pick(ctx, opts)
		}
	}
	return p.pick(ctx, opts)
}


func (p *p2cPicker) pick(ctx context.Context, opts balancer.PickInfo) (balancer.SubConn, func(balancer.DoneInfo), error) {
	var pc, upc *subConn

	// 当前时间
	start := time.Now().UnixNano()

	if len(p.subConns) <= 0 {
		return nil, nil, balancer.ErrNoSubConnAvailable
	} else if len(p.subConns) == 1 {
		// 只有 1 个节点,直接返回
		pc = p.subConns[0]
	} else {
		nodeA, nodeB := p.prePick()
		// meta.Weight 为服务发布者在 disocvery 中设置的权重
		if nodeA.load()*nodeB.health()*nodeB.meta.Weight > nodeB.load()*nodeA.health()*nodeA.meta.Weight {
			//pc 为本次算法选择的节点
			// upc为落选的节点
			pc, upc = nodeB, nodeA
		} else {
			pc, upc = nodeA, nodeB
		}
		// 如果落选的节点,在 forceGap 期间内没有被选中一次,那么强制选中一次
		// 利用强制的机会,来触发成功率、延迟的衰减
		// 原子锁 conn.pick 保证并发安全,放行一次
		pick := atomic.LoadInt64(&upc.pick)
		if start-pick > forceGap && atomic.CompareAndSwapInt64(&upc.pick, pick, start) {
			pc = upc	//强制选中
		}
	}

	// 节点未发生切换时,才更新 pick 时间
	if pc != upc {
		atomic.StoreInt64(&pc.pick, start)
	}

	atomic.AddInt64(&pc.inflight, 1)
	atomic.AddInt64(&pc.reqs, 1)

	// RPC 方法执行完成后,更新状态,此处分析见下面代码
	return pc.conn, func(di balancer.DoneInfo) {
		// inflight完成:减一
		atomic.AddInt64(&pc.inflight, -1)
		now := time.Now().UnixNano()
		// get moving average ratio w
		stamp := atomic.SwapInt64(&pc.stamp, now)
		td := now - stamp
		if td < 0 {
			td = 0
		}
		// 计算牛顿冷却定理使用的因子
		w := math.Exp(float64(-td) / float64(tau))

		// 实际耗时
		lag := now - start
		if lag < 0 {
			lag = 0
		}
		oldLag := atomic.LoadUint64(&pc.lag)
		if oldLag == 0 {
			w = 0.0
		}
		lag = int64(float64(oldLag)*w + float64(lag)*(1.0-w))
		atomic.StoreUint64(&pc.lag, uint64(lag))

		success := uint64(1000) // error value ,if error set 1
		if di.Err != nil {
			if st, ok := status.FromError(di.Err); ok {
				// only counter the local grpc error, ignore any business error
				if st.Code() != codes.Unknown && st.Code() != codes.OK {
					success = 0
				}
			}
		}
		oldSuc := atomic.LoadUint64(&pc.success)
		success = uint64(float64(oldSuc)*w + float64(success)*(1.0-w))
		atomic.StoreUint64(&pc.success, success)

		// 从服务端的 Trailer 中拿到 CPU 的值
		// 并保存
		trailer := di.Trailer
		if strs, ok := trailer[wmd.CPUUsage]; ok {
			if cpu, err2 := strconv.ParseUint(strs[0], 10, 64); err2 == nil && cpu > 0 {
				atomic.StoreUint64(&pc.svrCPU, cpu)
			}
		}

		logTs := atomic.LoadInt64(&p.logTs)
		if now-logTs > int64(time.Second*3) {
			if atomic.CompareAndSwapInt64(&p.logTs, logTs, now) {
				p.printStats()
			}
		}
	}, nil
}
这里把 RPC 调用成功时的回调逻辑简单分析下:
//被pick后,完成请求后触发逻辑
start := time.Now().UnixNano()
......
return pc.conn, func(di balancer.DoneInfo) {
	// 当前正在处理的请求数减 1,好理解
	atomic.AddInt64(&pc.inflight, -1)

	// 取当前的时间戳(Nano)
	now := time.Now().UnixNano()
	// get moving average ratio w
	// 获取 && 设置上次测算的时间点,将 pc.stamp 的值更新为 now
	stamp := atomic.SwapInt64(&pc.stamp, now)

	// 获取时间间隔
	// 重点:计算距离上次response的时间差,节点本身闲置越久,这个值越大
	td := now - stamp
	if td < 0 {
		td = 0
	}

	// 获取时间衰减系数
	// 实时计算β值,利用衰减函数计算,公式为:β = e^(-t/k)
	// 与原文衰减公式不同
	// 这里是按照k值的反比计算的,即k值和β值成正比
	// 与前文描述略有差异,这里的牛顿冷却因子计算是采用了td值(即公式中的t),即该节点(长连接)上次被选中的时间
	// 即td的值越大(节点越久没被选中),w的值越小
	w := math.Exp(float64(-td) / float64(tau))

	// 获得本次延迟数据 1(注意 start 是在 pick 开始计时的)
	// lag 为实际耗时
	lag := now - start
	if lag < 0 {
		lag = 0
	}

	// 获取上次保存的延迟数据 2
	oldLag := atomic.LoadUint64(&pc.lag)
	if oldLag == 0 {
		w = 0.0
	}

	// 延迟数据 1 与延迟数据 2,计算出平均延迟
	// 利用EWMA算法,计算指数加权移动平均响应时间
	lag = int64(float64(oldLag)*w + float64(lag)*(1.0-w))

	// 保存本此计算出的加权平均延迟数据
	atomic.StoreUint64(&pc.lag, uint64(lag))

	success := uint64(1000) // error value ,if error set 1
	if di.Err != nil {
		if st, ok := status.FromError(di.Err); ok {
			// only counter the local grpc error, ignore any business error
			if st.Code() != codes.Unknown && st.Code() != codes.OK {
				success = 0
			}
		}
	}
	oldSuc := atomic.LoadUint64(&pc.success)
	// 计算指数加权移动平均成功率并更新
	success = uint64(float64(oldSuc)*w + float64(success)*(1.0-w))
	atomic.StoreUint64(&pc.success, success)

	// 从服务端的 Trailer 中拿到 CPU 的值
	// 并更新本次请求服务端返回的cpu使用率
	trailer := di.Trailer
	if strs, ok := trailer[wmd.CPUUsage]; ok {
		if cpu, err2 := strconv.ParseUint(strs[0], 10, 64); err2 == nil && cpu > 0 {
			atomic.StoreUint64(&pc.svrCPU, cpu)
		}
	}

	logTs := atomic.LoadInt64(&p.logTs)
	if now-logTs > int64(time.Second*3) {
		// 超过一个 3s 的周期,尝试打印当前状态
		if atomic.CompareAndSwapInt64(&p.logTs, logTs, now) {
			p.printStats()
		}
	}
}, nil
在上面的代码中,与算法描述不同,这里的w计算是采用了两次节点被选中的时间差来计算牛顿冷却因子,这样理解就清晰了:如果被选中的这个节点在此之前一直未被选中,那么存在两种可能:
- 该节点因随机算法一直未被选中
- 当P2C选中了包含这个节点(和其他另外一个节点),此节点打分处于劣势,未被选中
那么此次选中了该节点,那么上面的时间差td越大(td = now - stamp),w的值就越小,套入EWMA公式可知,该节点的旧数据的比重应该降低(因为本节点太久没有被选中了,所以历史数据不可信),本地RPC调用的延迟数据的比重应该提高
{
	now := time.Now().UnixNano()
	......
	stamp := atomic.SwapInt64(&pc.stamp, now)
	td := now - stamp
	if td < 0 {
		td = 0
	}
	w := math.Exp(float64(-td) / float64(tau))
	......
	lag = int64(float64(oldLag)*w + float64(lag)*(1.0-w))
}
统计节点
//INFO 07/24-07:50:56.452 /root/delete/kratos-note/pkg/net/rpc/warden/balancer/p2c/p2c.go:292 p2c : [{addr:127.0.0.1:8081 score:783813.9288438039 cs:1000 lantency:2612717 cpu:789 inflight:1 reqs:1}]
// statistics is info for log
type statistic struct {
	addr     string
	score    float64
	cs       uint64
	lantency uint64
	cpu      uint64
	inflight int64
	reqs     int64
}


func (p *p2cPicker) printStats() {
	if len(p.subConns) <= 0 {
		return
	}
	stats := make([]statistic, 0, len(p.subConns))
	for _, conn := range p.subConns {
		var stat statistic
		log.Info("p2c detail [OLD] info %s : %+v", p.subConns[index].addr.ServerName, conn)
		stat.addr = conn.addr.Addr
		stat.cpu = atomic.LoadUint64(&conn.svrCPU)
		stat.cs = atomic.LoadUint64(&conn.success)
		stat.inflight = atomic.LoadInt64(&conn.inflight)
		stat.lantency = atomic.LoadUint64(&conn.lag)
		stat.reqs = atomic.SwapInt64(&conn.reqs, 0)
		load := conn.load()
		if load != 0 {
			stat.score = float64(stat.cs*conn.meta.Weight*1e8) / float64(load)
		}
		stats = append(stats, stat)
	}
	log.Info("p2c %s : %+v", p.subConns[0].addr.ServerName, stats)
    for index,conn:=range p.subConns{
        log.Info("p2c detail [NEW] info %s : %+v", p.subConns[index].addr.ServerName, conn)
    }
}
0x05 测试
给关键路径加上日志,看下这里具体参数和值的变化过程,这样对算法能够有更为直观的理解,以 etcd 为注册服务,启动三个后端(单个单个启动),观察下数据的变化
TODO