0x00 前言
延迟队列(Delay Queue)任务相关的业务场景如下:
场景一: 在订单系统中,一个用户某个时刻下单之后通常有 30 分钟的时间进行支付,如果 30 分钟之内没有支付成功,那么这个订单需要关闭;此外在未过期之前的 N 分钟需要通知用户进行支付
场景二: 用户某个时刻通过手机远程遥控家里的智能设备,设置在指定的时间(后)进行工作。这时就可以将用户指令发送到延时队列,当指令设定的时间到了再将指令推送到智能设备(运行)
关于延迟队列的文章,推荐阅读如下几篇:
美图开源了一款基于 Golang 实现的延迟队列 lmstfy:Let Me Schedule Tasks For You:基于 Redis 实现的简单任务队列(Task Queue)服务。主要提供以下特性:
本文分析基于的版本是 fcef927
0x01
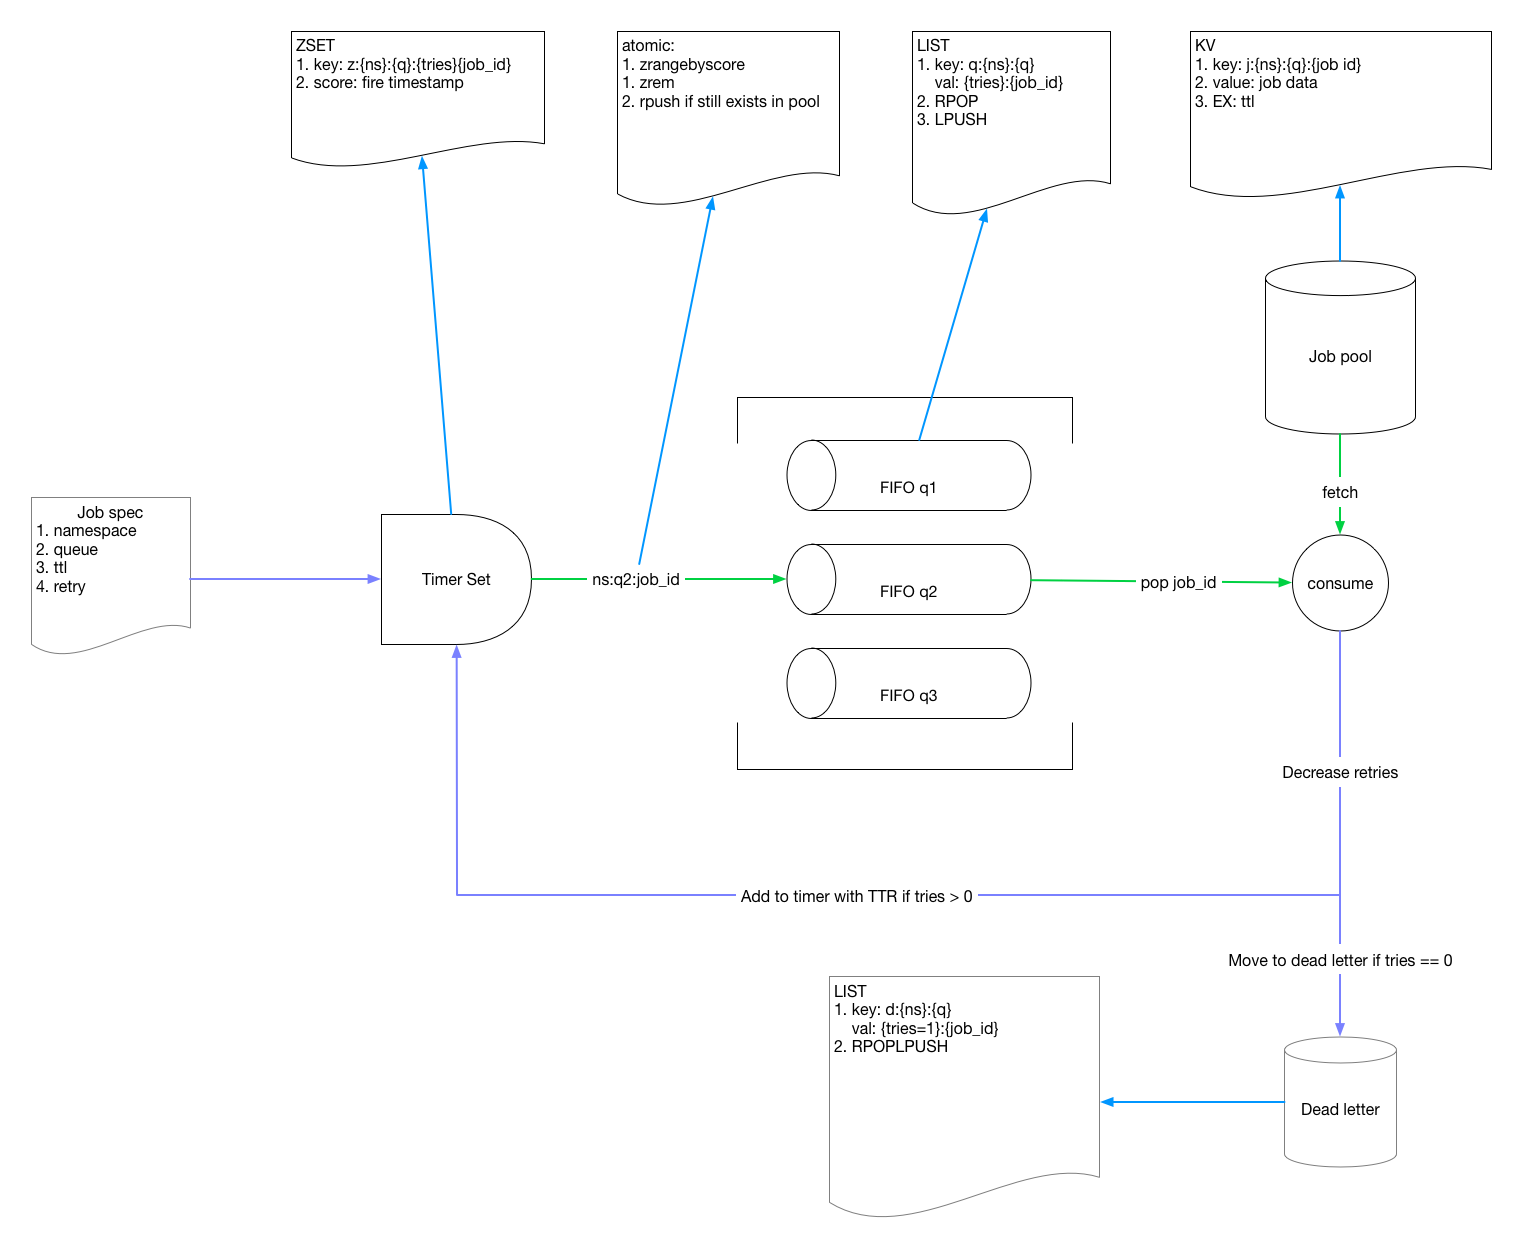
我们从官方的架构图出发来分析整个代码的实现:

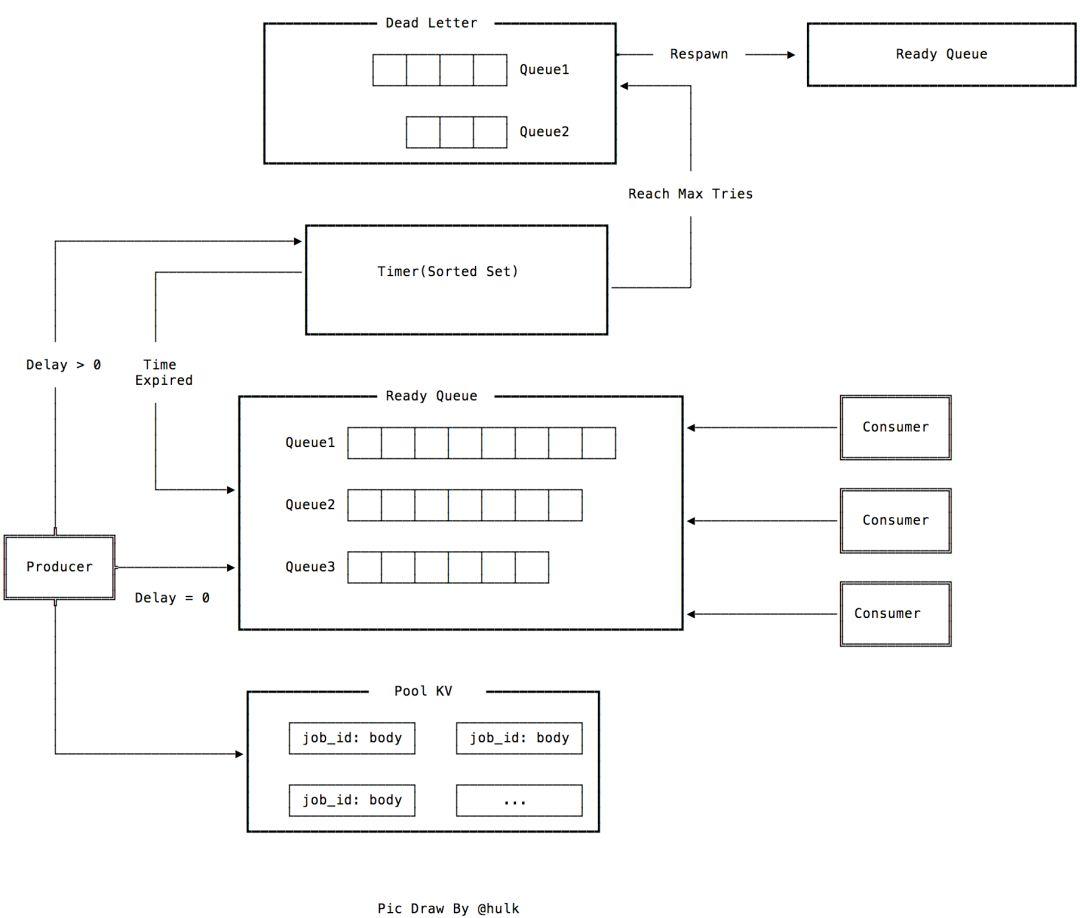
生产者到消费者的流程图如下:

- 外部接口部分:主要基于
gin封装了外部的 CGI 接口 - 存储接口部分:封装了 redis 底层的操作接口(如 List/Hash/Sortset 等),部分需要原子执行的操作采用 Lua 脚本进行了二次封装,主要被
gin实现的 cgi 方法所调用,完成相关的存取逻辑
从上图中看,整个 Redis 存储被划分为 4 块:
1、Pool KV:存储 Job,Job 创建代码 在此,jobid生成方法,实现 在此,采用了 sync.Pool 实现对象复用。key 为 jobid 的 复合结构,加入了业务、namespace,队列名字等属性,如 /PoolPrefix/Namespace/Queue/JobID
2、SortSet:所有 delay!=0 的任务都被被放入 Sortset 中,在 Timer 的 pump 逻辑,会开启单独的协程,监听这个 SortSet,把过期的 Job 从 SortSet 取出,放入 FIFO 队列
3、FIFO 队列,存放计时触发的 Job 或者 delay==0 的 Job,本质上是个 Redis 的 List 结构,FIFO 队列实现 代码在此,消费者在任务队列的队头轮询获取 Job,消费者的主要实现方法为 Engine.consume
4、DeadLetter 队列,是一定容灾机制的考虑
0x02 配置
lmstfy 的核心存储是 redis,先看下官方提供的示例配置如下,这里我比较感兴趣的是 redis 的配置,Pool.default、Pool.migrate 及 Pool.mysentinel:
Host = "0.0.0.0"
Port = 7777
AdminHost = "127.0.0.1" # optional, default to localhost
AdminPort = 7778
#LogDir = "/var/log/lmstfy"
LogLevel = "info"
#LogFormat = "text" # Use LogFormat="json" if wants to print the log with json format
EnableAccessLog = true

# default params
#TTLSecond = 24 * 60 * 60 // 1 day
#DelaySecond = 0
#TriesNum = 1
#TTRSecond = 2 * 60 // 2 minutes
#TimeoutSecond = 0  // means non-blocking

[AdminRedis]  # redis used to store admin data, eg. tokens
Addr = "localhost:6379"
# Password = foobared

[Pool]
[Pool.default]
Addr = "localhost:6379"
# Password = foobared
# DB = 0
#MigrateTo = "migrate" # When migration is enabled, all PUBLISH will go to `migrate` pool. and `default` will be drained
#[Pool.migrate]
#Addr = "localhost:6389"

#[Pool.mysentinel]
# Addr = "localhost:16379,localhost:6380,localhost:6381"
# MasterName = "mymaster"
# Password = foobared
根据 redis 的 info 指令的返回来判断集群的类型,如最基本的单机模式,就是 redis_mode:standalone,在 detectRedisMode 方法中实现。Redis 的配置存储模式,如下面所示:
type Config struct {
    ...
	AdminRedis      RedisConf
	Pool            RedisPool
    ...
}

type RedisPool map[string]RedisConf

type RedisConf struct {
	Addr      string
	Password  string
	DB        int
	PoolSize  int
	MigrateTo string // If this is not empty, all the PUBLISH will go to that pool

	mode       int
	MasterName string
}
redis 初始化如下,如果配置中使用的是 sentinel 的集群,会初始化 NewFailoverClient 代替 redis.NewClient(opt) 作为 redis 连接句柄返回:
// NewRedisClient wrap the standalone and sentinel client
func NewRedisClient(conf *config.RedisConf, opt *redis.Options) *redis.Client {
	if opt == nil {
		opt = &redis.Options{}
	}
	opt.Addr = conf.Addr
	opt.Password = conf.Password
	opt.PoolSize = conf.PoolSize
	opt.DB = conf.DB
	if conf.IsSentinel() {
		return redis.NewFailoverClient(&redis.FailoverOptions{
			MasterName:    conf.MasterName,
			SentinelAddrs: strings.Split(opt.Addr, ","),
			Password:      opt.Password,
			PoolSize:      opt.PoolSize,
			ReadTimeout:   opt.ReadTimeout,
			WriteTimeout:  opt.WriteTimeout,
			MinIdleConns:  opt.MinIdleConns,
			DB:            opt.DB,
		})
	}
	return redis.NewClient(opt)
}
0x02 Engine 结构
lmstfy 的任务存取及相关的逻辑处理都封装在 engine 中。
核心接口 Engine,Engine 是一个抽象的 interface。此外定义了 EnginePool 和全局变量 engines,engines 是一个二级 map,定义如下:
- 一级 key 为:
type EnginePool map[string]Engine
var engines = make(map[string]EnginePool)
type Engine interface {
	Publish(namespace, queue string, body []byte, ttlSecond, delaySecond uint32, tries uint16) (jobID string, err error)
	Consume(namespace, queue string, ttrSecond, timeoutSecond uint32) (job Job, err error)
	ConsumeMulti(namespace string, queues []string, ttrSecond, timeoutSecond uint32) (job Job, err error)
	BatchConsume(namespace, queue string, count, ttrSecond, timeoutSecond uint32) (jobs []Job, err error)
	Delete(namespace, queue, jobID string) error
	Peek(namespace, queue, optionalJobID string) (job Job, err error)
	Size(namespace, queue string) (size int64, err error)
	Destroy(namespace, queue string) (count int64, err error)

	// Dead letter
	PeekDeadLetter(namespace, queue string) (size int64, jobID string, err error)
	DeleteDeadLetter(namespace, queue string, limit int64) (count int64, err error)
	RespawnDeadLetter(namespace, queue string, limit, ttlSecond int64) (count int64, err error)
	SizeOfDeadLetter(namespace, queue string) (size int64, err error)

	Shutdown()

	DumpInfo(output io.Writer) error
}
0x03 JOB 结构
Job 结构的 定义在此,包含两个重要结构,Job 为抽象接口 interface,jobImpl 为具体的 Job 结构实现:
type Job interface {
	Namespace() string
	Queue() string
	ID() string
	Body() []byte
	TTL() uint32
	Delay() uint32
	Tries() uint16
	ElapsedMS() int64
	encoding.BinaryMarshaler
	encoding.BinaryUnmarshaler
}

type jobImpl struct {
	namespace string
	queue     string
	id        string
	body      []byte
	ttl       uint32
	delay     uint32
	tries     uint16
	_elapsedMS int64
}
一个 jobImpl 包含如下成员:
namespace:用来隔离业务,每个业务是独立的namespace,该 job 属于哪个 namespace- queue - 队列名称,用区分同一业务不同消息类型
- job - 业务定义的业务,主要包含以下几个属性:
- id: 任务 ID,全局唯一,使用
uuid生成 - delay: 任务延时下发时间, 单位是秒
- tries: 任务最大重试次数,tries = N 表示任务会最多下发 N 次
- ttl(time to live): 任务最长有效期,超过之后任务自动消失
- ttr(time to run): 任务预期执行时间,超过 ttr 则认为任务消费失败,触发任务自动重试
创建 Job && 存储
NewJob 和 NewJobWithID 两种方法来创建 Job,这里注意一点 uuid 的生成中,传入了 delay 参数,换句话说,可以从 uuid 中解出得到 delay 信息:
func GenUniqueJobIDWithDelay(delaySecond uint32) string {
        entropy := entropyPool.Get().(*rand.Rand)
        defer entropyPool.Put(entropy)
        id := ulid.MustNew(ulid.Now(), entropy)
        // Encode the delayHour in littleEndian and store at the last four bytes
        binary.LittleEndian.PutUint32(id[len(id)-4:], delaySecond)
        return id.String()
}

// NOTE: there is a trick in this factory, the delay is embedded in the jobID.
// By doing this we can delete the job that's located in hourly AOF, by placing
// a tombstone record in that AOF.
func NewJob(namespace, queue string, body []byte, ttl, delay uint32, tries uint16) Job {
	id := uuid.GenUniqueJobIDWithDelay(delay)
	return &jobImpl{
		namespace: namespace,
		queue:     queue,
		id:        id,
		body:      body,
		ttl:       ttl,
		delay:     delay,
		tries:     tries,
	}
}
此外,为了减少 job 结构体的内存占用,在存储之前会使用 MarshalBinary 对其进行 pack 格式化为二进制,UnmarshalBinary 方法 为 unpack,这个压缩(解压)逻辑可以抽象到自己项目中使用:
// Marshal into binary of the format:
// {total len: 4 bytes}{ns len: 1 byte}{ns}{queue len: 1 byte}{queue}{id: 16 bytes}{ttl: 4 bytes}{tries: 2 byte}{job data}
func (j *jobImpl) MarshalBinary() (data []byte, err error) {
	nsLen := len(j.namespace)
	qLen := len(j.queue)
	bodyLen := len(j.body)
	totalSize := 1 + nsLen + 1 + qLen + 16 + 4 + 2 + bodyLen
	buf := make([]byte, totalSize+4)
	binary.LittleEndian.PutUint32(buf, uint32(totalSize))

	nsOffset := 4 + 1
	qOffset := nsOffset + nsLen + 1
	idOffset := qOffset + qLen
	ttlOffset := idOffset + 16
	triesOffset := ttlOffset + 4
	jobOffset := triesOffset + 2

	buf[4] = uint8(nsLen)
	copy(buf[nsOffset:], j.namespace)
	buf[qOffset-1] = uint8(qLen)
	copy(buf[qOffset:], j.queue)
	binID := uuid.UniqueIDToBinary(j.id)
	copy(buf[idOffset:], binID[:]) // binary ID is 16 byte-long
	binary.LittleEndian.PutUint32(buf[ttlOffset:], j.ttl)
	binary.LittleEndian.PutUint16(buf[triesOffset:], j.tries)
	copy(buf[jobOffset:], j.body)
	return buf, nil
}
0x04 engine.redis 结构(核心)
engine.redis 实现 是本项目的核心,上一小节,engine 包中定义了一个全局变量 engines,对应于下图的结构:
type EnginePool map[string]Engine
var engines = make(map[string]EnginePool)
Engine 结构的主要封装如下图所示:

如上图中,每个 redis.Engine 包含了如下成员:
- redis *RedisInstance // 包含了 name 和具体的 redis 连接句柄
- pool *Pool
- timer *Timer
- meta *MetaManager
- monitor *SizeMonitor
type RedisInstance struct {
	Name string
	Conn *go_redis.Client
}

// Engine that connects all the dots including:
// - store jobs to timer set or ready queue
// - deliver jobs to clients
// - manage dead letters
type Engine struct {
	redis   *RedisInstance  // 包含了 name 和具体的 redis 连接句柄
	pool    *Pool
	timer   *Timer
	meta    *MetaManager
	monitor *SizeMonitor
}
接下来,我们分析下 redis.Engine 的成员及其方法:
redis.RedisInstance 成员
redis.Pool 成员
redis.Timer 成员
redis.MetaManager 成员
redis.SizeMonitor 成员
redis 的 Metrics 上报
##