0x00 前言
前一篇文章,介绍过 Nginx 的负载均衡算法。upstream 机制使得 Nginx 通常用于反向代理服务器,Nginx 接收来自下游客户端的 Http 请求,并处理该请求,同时根据该请求向上游服务器发送 Tcp 请求报文,上游服务器会根据该请求返回相应地响应报文,Nginx 根据上游服务器的响应报文,决定是否向下游客户端转发响应报文。另外 upstream 机制提供了负载均衡的功能,可以将请求负载均衡到集群服务器的某个服务器上面。
同时,上一篇文章介绍了采用 Confd+Nginx 的 方案,不过,在高并发的场景下,使用 nginx -s reload 方式可能会带来性能上的损耗,不够优雅。本篇介绍下 Weibo 开源的 Nginx Module:Upsync,基于 Nginx 容器动态流量管理方案。该方案结合了 Nginx 的健康检查模块,以及动态 reload 机制,可以近乎无损的服务的升级上线与扩容。
Upsync 是 Nginx 和 Etcd、Consul 等服务发现组件非常好的结合实践。Upsync-Module 提供了动态的负载均衡,它可以从 Consul/Etcd 同步 upstreams,而且支持动态修改后端服务器属性(如 weight,max_fails,down 等参数),无须重新加载 Nginx,从而实现平滑伸缩。
关于在高并发下 reload 带来的影响可以参见 Upsync:微博开源基于 Nginx 容器动态流量管理方案
在流量比较重的情况下,发起 reload 会对性能造成影响。reload 的同时会引发新的 work 进程的创建,在一段时间内新旧 work 进程会同时存在,并且旧的 work 进程会频繁的遍历 connection 链表,查看是否请求已经处理结束,若结束便退出进程;另 reload 也会造成 Nginx 与 client 和 backend 的长链接关闭,新的 work 进程需要创建新的链接。在 reload 时 Nginx 的请求处理能力会下降。
0x01 架构 && 流程
- nginx-upsync-module:支持 Http 的配置
- nginx-stream-upsync-module:支持 Stream(四层)的代理配置
本小节简单介绍下 Upsync 的实现原理。
基于动态路由的方案设计
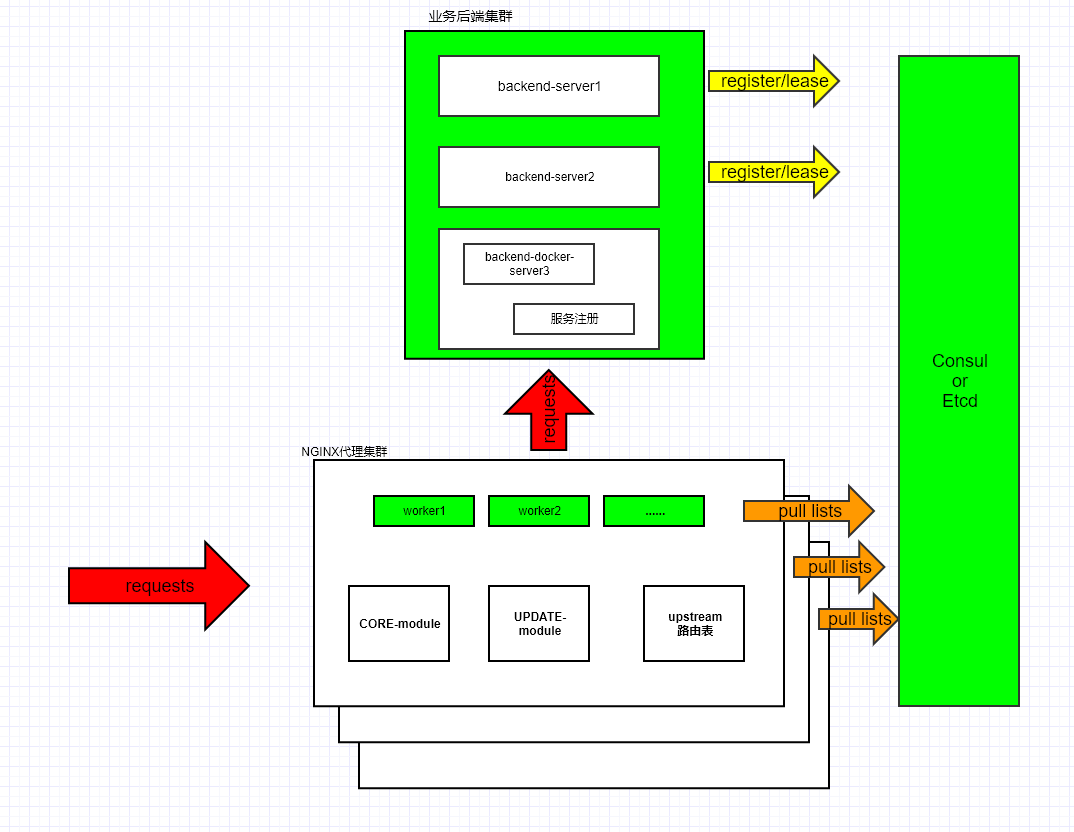
在 Nginx 的设计中,每一个 upstream 维护了一张静态路由表(注意:静态),存储了 backend 的 ip、port 以及其他的 metadata。每次请求到达后,会依据路由 location 配置检索路由表,然后依据具体的调度(负载均衡)算法选择一个 backend 转发请求。 但这张路由表是静态的,如果变更后,则必须 reload ,解决 reload 的关键就是将静态路由表调整为动态的,即每次更新 backend 后,动态更新或创建一张新的路由表,从而无需 reaload 即可生效。本文介绍的 Nginx 扩展模块 nginx-upsync-module 即可完成此功能(动态更新维护路由表)。
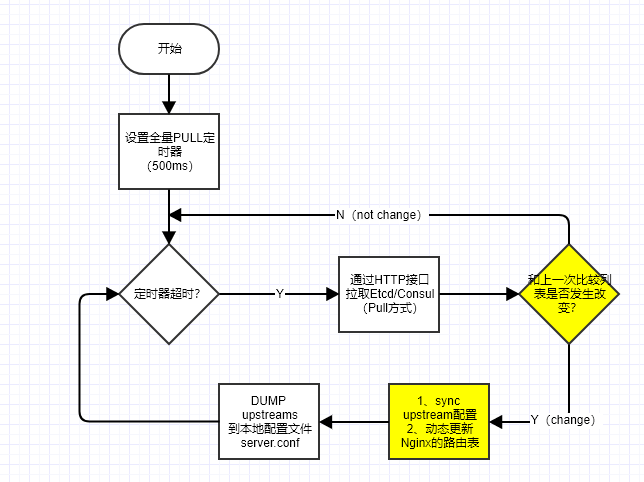
nginx-upsync-module 采用 PULL 方案来完成获取最新 backend 列表的功能,实现细节如下:
- 提供外部接口,将路由表中所有的后端节点
backend信息及相关属性(如权重、参数等)存储到 Consul/Etcd,Nginx 本地初始化一份本地backend配置 - 所有的 Nginx 通过调用 Consul/Etcd 的 API 接口拉取
backend列表,并和本地保存的列表比较,有变更则更新路由表,实现动态更新路由的功能- Nginx 启动时,master 进程首先会解析本地的配置文件,解析完成功,接着进行一系列的初始化,之后便会开始 Worker 进程的初始化
- Worker 初始化时会去 Consul 拉取配置,进行 Worker 进程 upstream 路由信息的更新,若拉取成功,便直接更新,若拉取失败,便会打开配置的 dump 后端列表的文件,提取之前 dump 下来的 server 信息,进行 upstream 路由的更新,之后便开始正常的提供服务
- 每个 Work 进程定时的去 Consul/Etcd 拉取相应 upstream 的配置,若 Consul 发现对应 upstream 的值没有变化,便会 hang 住这个请求
5分钟。在5分钟内对此 upstream 的任何操作,都会立刻返回给 Nginx 对相应路由进行更新 - 当
upstream变更后,除了更新 Nginx 的缓存路由信息,还会把本次upstream的后端backend列表 dump 到本地,保持本地 server 信息与远端的一致性,代码见此 - 除了注册 / 注销后端的
backend到 Consul,会更新到 Nginx 的 upstream 路由信息外,对后端backend属性的修改也会同步到 Nginx 的 upstream 路由,Upsync 模块支持修改的属性有weight、max_fails、fail_timeout和down
属性说明如下:
| backend 属性 | 说明 |
|---|---|
| weight | 服务器权重,默认为 1。修改权重可以动态的调整后端的流量 |
| max_fails | 最大尝试失败次数,默认为 1,将其设置为 0 可以关闭检查 |
| fail_timeout | 失效时间,默认为 10 秒。在这个时间内产生了 max_fails 所设置大小的失败尝试连接请求后这个服务器可能不可用 |
| down | 标记服务器处于离线状态。1:离线;0:在线,若想要临时移除 server,可以把 server 的 down 属性置为 1。若要恢复流量,可重新把 down 置为 0 |
模块的 HA 设计
Upsync 模块在高可用性 HA 上也有一定考虑,不强依赖 Consul/Etcd(更新除外):
- 即使中途 Consul/Etcd 集群不可用,也不会影响 Nginx 的服务,Nginx 会沿用最后一次更新的服务列表继续提供服务
- 若 Consul/Etcd 集群重新提供服务,这个时候 Nginx 会继续去 Consul/Etcd 探测,且 Consul/Etcd 的后端
backend列表发生了变化,也会及时的更新到 Nginx - Worker 进程每次更新都会把后端列表 dump 到本地,目的是降低对 Consul/Etcd 的依赖性,即使在 Consul/Etcd 不可用时,也可以 Reload Nginx 继续生效
0x02 UpSync 配置及使用
配置指令说明
| 指令 | 位置 | 功能 | 语法示例 | 默认值 |
|---|---|---|---|---|
| upsync | upstream | 从 Consul/Etcd 获取 upstream 服务列表 |
upsync consul.api.com:port/v1/kv/upstreams/$upstream_name [upsync_type=consul] [upsync_interval=seconds/minutes] [upsync_timeout=seconds/minutes] [strong_dependency=off/on]; | upsync_interval=5s upsync_timeout=6m strong_dependency=off |
配置示例
先来看一个 Upsync 配置示例:
worker_processes  4;

load_module modules/ngx_http_upsync_module.so;

events {
    worker_connections  1024;
}

http {
    include       mime.types;
    default_type  application/octet-stream;

    log_format  main  '$remote_addr - $remote_user [$time_local]"$request" '
                      '$status $body_bytes_sent"$http_referer" '
                      '"$http_user_agent" "$http_x_forwarded_for"';

    access_log  logs/access.log  main;

    upstream test {
        upsync 127.0.0.1:2379/v2/keys/upstreams/pool upsync_timeout=6m upsync_interval=500ms upsync_type=etcd strong_dependency=off;
        upsync_dump_path /etc/nginx/server_list.conf;
        include /etc/nginx/server_list.conf;
    }

    upstream bar {
        server 127.0.0.1:8090 weight=1 fail_timeout=10 max_fails=3;
    }

    server {
        listen 80;

        location = /index.html {
            proxy_pass http://test;
        }

        location = /bar {
            proxy_pass http://bar;
        }

        location = /upstream_show {
            upstream_show;
        }
    }
}
初始化 server 列表如下:
cat /etc/nginx/server_list.conf
server 127.0.0.1:8080 weight=1 max_fails=2 fail_timeout=10s;
server 127.0.0.1:8081 weight=1 max_fails=2 fail_timeout=10s;
通过 ETCD V2 版本接口进行数据操作:
#增加 upstream 节点,默认属性为:weight=1 max_fails=2 fail_timeout=10 down=0 backup=0;
curl -X PUT http://127.0.0.1:2379/v2/keys/upstreams/pool/127.0.0.1:8082
#删除数据
curl -X DELETE http://127.0.0.1:2379/v2/keys/upstreams/pool/127.0.0.1:8080
#获取数据
curl http://127.0.0.1:2379/v2/keys/upstreams/pool
#增加节点,或者修改属性
curl -X PUT -d value='{"weight":1,"max_fails":2,"fail_timeout":10}' http://127.0.0.1:2379/v2/keys/upstreams/pool/127.0.0.1:8081
#标记节点下线
curl -X PUT -d value='{"weight":2,"max_fails":2,"fail_timeout":10,"down":1}' http://127.0.0.1:2379/v2/keys/upstreams/pool/127.0.0.1:8082
#查看当前 upstream
http://127.0.0.1/upstream_show
Upstream name: test; Backend server count: 2
        server 127.0.0.1:8081 weight=1 max_fails=2 fail_timeout=10s;
        server 127.0.0.1:8082 weight=1 max_fails=2 fail_timeout=10s;

Upstream name: bar; Backend server count: 1
        server 127.0.0.1:8090 weight=1 max_fails=3 fail_timeout=10s;
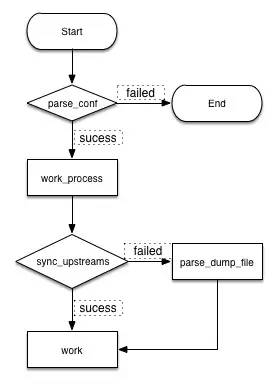
0x03 核心代码分析
整个模块的核心逻辑在 ngx_http_upsync_module.c,需要对 Nginx 的 Module 开发有些了解。
模块的基本流程如下:
Etcd 的实现
Etcd 的更新流程 在此,分为下面几个步骤:
static ngx_upsync_conf_t  ngx_upsync_types[] = {
    //...
 {ngx_string("etcd"),
      NGX_HTTP_UPSYNC_ETCD,
      ngx_http_upsync_send_handler,
      ngx_http_upsync_recv_handler,
      ngx_http_upsync_etcd_parse_init,
      ngx_http_upsync_etcd_parse_json,
      ngx_http_upsync_clean_event },
}
ngx_http_client_send 函数,调用 GET 请求访问 Consul 或者 Etcd 集群并获取结果:
static ngx_int_t
ngx_http_client_send(ngx_http_conf_client *client,
    ngx_http_upsync_server_t *upsync_server)
{
    size_t       size = 0;
    ngx_int_t    tmp_send = 0;
    ngx_uint_t   send_num = 0;

    ngx_upsync_conf_t           *upsync_type_conf;
    ngx_http_upsync_srv_conf_t  *upscf;

    upscf = upsync_server->upscf;
    upsync_type_conf = upscf->upsync_type_conf;

    u_char request[ngx_pagesize];
    ngx_memzero(request, ngx_pagesize);

    if (upsync_type_conf->upsync_type == NGX_HTTP_UPSYNC_CONSUL
        || upsync_type_conf->upsync_type == NGX_HTTP_UPSYNC_CONSUL_SERVICES
        || upsync_type_conf->upsync_type == NGX_HTTP_UPSYNC_CONSUL_HEALTH)
    {
        ngx_sprintf(request, "GET %V?recurse&index=%uL HTTP/1.0\r\nHost: %V\r\n"
                    "Accept: */*\r\n\r\n",
                    &upscf->upsync_send, upsync_server->index,
                    &upscf->conf_server.name);
    }

    if (upsync_type_conf->upsync_type == NGX_HTTP_UPSYNC_ETCD) {
        ngx_sprintf(request, "GET %V? HTTP/1.0\r\nHost: %V\r\n"
                    "Accept: */*\r\n\r\n",
                    &upscf->upsync_send, &upscf->conf_server.name);
    }

    //...
}
其他细节
1、使用 ngx_add_timer 添加定时器(单位:ms)
Nginx 在 event 模块里实现了精确到毫秒级别的定时器机制,使用红黑树结构管理所有定时器对象
2、在此实践中使用域名方式连接 Consul 时可能会有坑,见 网易杭研 Nginx 自动扩缩容实践,本文不做深入探讨。规避方式是采用 ip:port 方式连接。