0x00 前言
通常在 Golang 中,缓存的实现离不开如下几种:
- 原生
map sync.Map- 基于以上二者封装的复合型
map
前两者的缺点也很明显:
- 当
map中存在大量 keys 时,GC 扫描map产生的停顿将不能忽略(针对map中存储指针或数据类型底层也是由指针实现这样的场景) - 加锁的粒度
基于较新版本的 Golang(大于 1.4),提高缓存性能的手段也是明确的:
- 减少 GC
map中尽量避免存储指针- 分段(Shards)存储,减少
lock
本篇文章要分析的项目 BigCache 就是这么一种高性能复合封装 map 的实现,另外通过巧妙的构造实现了对性能的提升(基于以上的优化思路)。
0x01 为什么使用 BigCache
bigCache 本地缓存库以其快速、并发和高性能著称,它可以存储百万级的数据。bigCache ,为了规避 GC 的影响,核心存储 map 结构中 key 和 value 中均不包含指针类型数据,底层数据结构采用 bytes 切片。从宏观上看像是索引(index)与数据(data)分离存储的 map 结构。
由于 bigCache 的巧妙设计,这样 GC 就变成了 map 无指针结构 和 []byte 结构的扫描问题了,因此性能会高出很多(这样做,只会给GC增加了仅1个额外对象,由于字节切片除了自身对象并不包含其他指针数据,所以GC对于整个对象的标记时间是O(1)的)
底层依然使用 map 存储
GC ignore maps with no pointers
bigCache 的 底层 仍然用 map 存储,为何使用 map 呢?GoLang 1.5 版本的 优化说明: 如果 map 的 key 或 value 中都不含指针, GC 便会忽略这个 map,只不过 map 是不含指针类型的,该 map 用于存储 key 的 hash 值与数据在 []byte 区域的下标,和 索引与数据分离的 hashtable 文中介绍的 hash 类似。见下面的 cacheShard 结构中的 hashmap 及 entries 成员:
type cacheShard struct {
	hashmap     map[uint64]uint32	// 上面的 map
	entries     queue.BytesQueue	// 数据存储
	lock        sync.RWMutex
	entryBuffer []byte
	onRemove    onRemoveCallback

	isVerbose    bool
	statsEnabled bool
	logger       Logger
	clock        clock
	lifeWindow   uint64

	hashmapStats map[uint64]uint32
	stats        Stats
}
并发访问:分片存储
bigCache 中使用了分片技术shards来减少使用sync.RWMutex带来的加锁竞争粒度(使用读写锁保证在一个时间点只允许一个协程修改缓存内容)的问题。创建 N 个 shard,每个 shard 包含一个带锁的 cacheShard,bigCache 将数据分散到不同的 cacheShard 进行存储。当从缓存中读写数据时,根据 HashFunc(key)%N 选择其中一个 cacheShard ,获取缓存锁 cacheShard.lock,这样可以大幅降低并发过程中的锁粒度。
简言之,一个shard是一个结构体,它包含了一个带锁的cache实例。BigCache使用了一个元素个数为N的shard数组,然后将数据打散到不同的shard中存储,当从缓存中读写数据时,缓存会选取其中的一个shard使用,此方式可以显著减小锁粒度,因为lock范围从全局缩小到了单个shard中
规避 GC
从 bigCache 的 cacheShard 结构来看,使用了 map[uint64]uint32 结构,其中 key 和 value 均无指针结构,其中 value 会追加到一个全局的 []byte 中,每一个 shard 中包含一个全局 []byte 类型的结构 queue.BytesQueue。由于此字节切片除了自身对象不包含其他指针,所以 GC 对于整个 cacheShard 的标记时间是 O(1)
使用及注意事项
bigCache 对高并发及百万级别缓存都支持极好,不过其无持久化功能,只能用作单机缓存。
本文按照自底向上的顺序来分析bigCache:
- Entry:用户数据(编码)
- BytesQueue:entry的载体
- cacheShard:shard分片
- bigCache
0x02 用户数据(数据序列化 / pack)
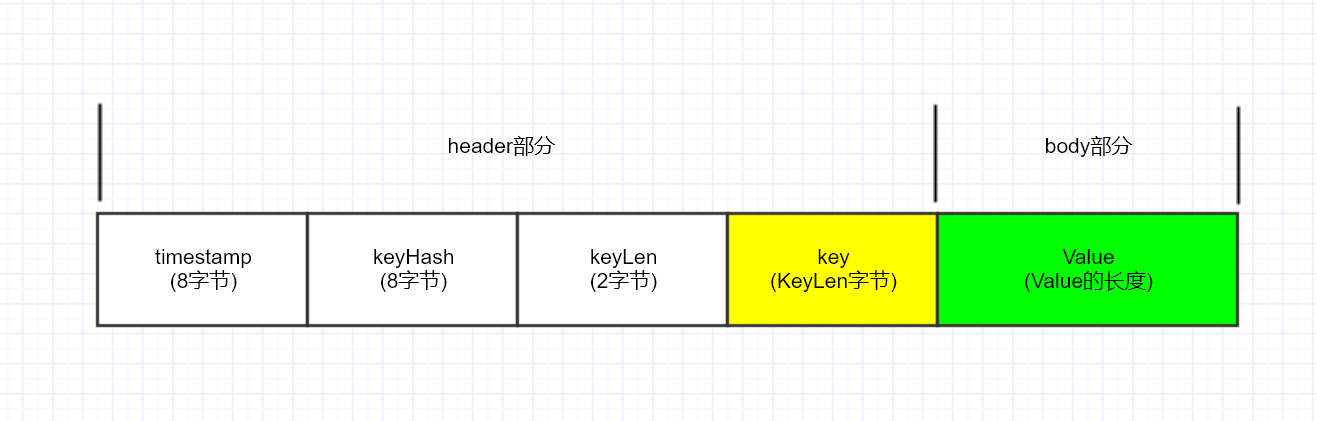
在许多高性能的组件实现,针对数据部分的存储大都会将其由 string 类型按照一定的 pack 格式转为 binary 类型以减少内存占用,在 bigCache 也是类似做法,每个要插入的 key-value 由 5 部分组成,分别是:
- 时间戳 (
8byte):使用时间戳来实现到期后的expire功能 - key 的 hash 值 (
8byte) - key 的长度 (
2byte) - key 的值以及 value 的值:根据各自的长度申请
序列化时采用 LittleEndian 小端序。对 timestamp 和 hash 和 key 和 value 封装在一起。这种形式的存储和 leveldb 的实现类似。
简单而言,bigCache 的 pack 结构就是在原 value 的前面加多一个 header, 为了提高效率使用 binary 库直接操作 []byte。如果要进行查找和删除数据可以通过 map 找到数据保存的位置。
const (
    timestampSizeInBytes = 8  // 存放时间戳
    hashSizeInBytes      = 8  // 存放 hash 值
    keySizeInBytes       = 2  // 存放 key 的长度
    headersSizeInBytes   = timestampSizeInBytes + hashSizeInBytes + keySizeInBytes // header 的长度
)
最终的存储 Unit 如下图所示:
wrapEntry 完成的上述 pack 的过程(通用的方法),将 key 和 value 都 pack:
func wrapEntry(timestamp uint64, hash uint64, key string, entry []byte, buffer *[]byte) []byte {
    keyLength := len(key)  // key 的长度
    blobLength := len(entry) + headersSizeInBytes + keyLength

    if blobLength > len(*buffer) {
        *buffer = make([]byte, blobLength)
    }
    blob := *buffer
  	// 数据存储采用小端序 LittleEndian
    binary.LittleEndian.PutUint64(blob, timestamp)
    binary.LittleEndian.PutUint64(blob[timestampSizeInBytes:], hash)
    binary.LittleEndian.PutUint16(blob[timestampSizeInBytes+hashSizeInBytes:], uint16(keyLength))
    copy(blob[headersSizeInBytes:], key)
    copy(blob[headersSizeInBytes+keyLength:], entry)
    return blob[:blobLength]
}


func readEntry(data []byte) []byte {
	length := binary.LittleEndian.Uint16(data[timestampSizeInBytes+hashSizeInBytes:])
	return data[headersSizeInBytes+length:]
}

func readTimestampFromEntry(data []byte) uint64 {
	return binary.LittleEndian.Uint64(data)
}

func readKeyFromEntry(data []byte) string {
	length := binary.LittleEndian.Uint16(data[timestampSizeInBytes+hashSizeInBytes:])
	return string(data[headersSizeInBytes : headersSizeInBytes+length])
}

func readHashFromEntry(data []byte) uint64 {
	return binary.LittleEndian.Uint64(data[timestampSizeInBytes:])
}

func resetKeyFromEntry(data []byte) {
	binary.LittleEndian.PutUint64(data[timestampSizeInBytes:], 0)
}
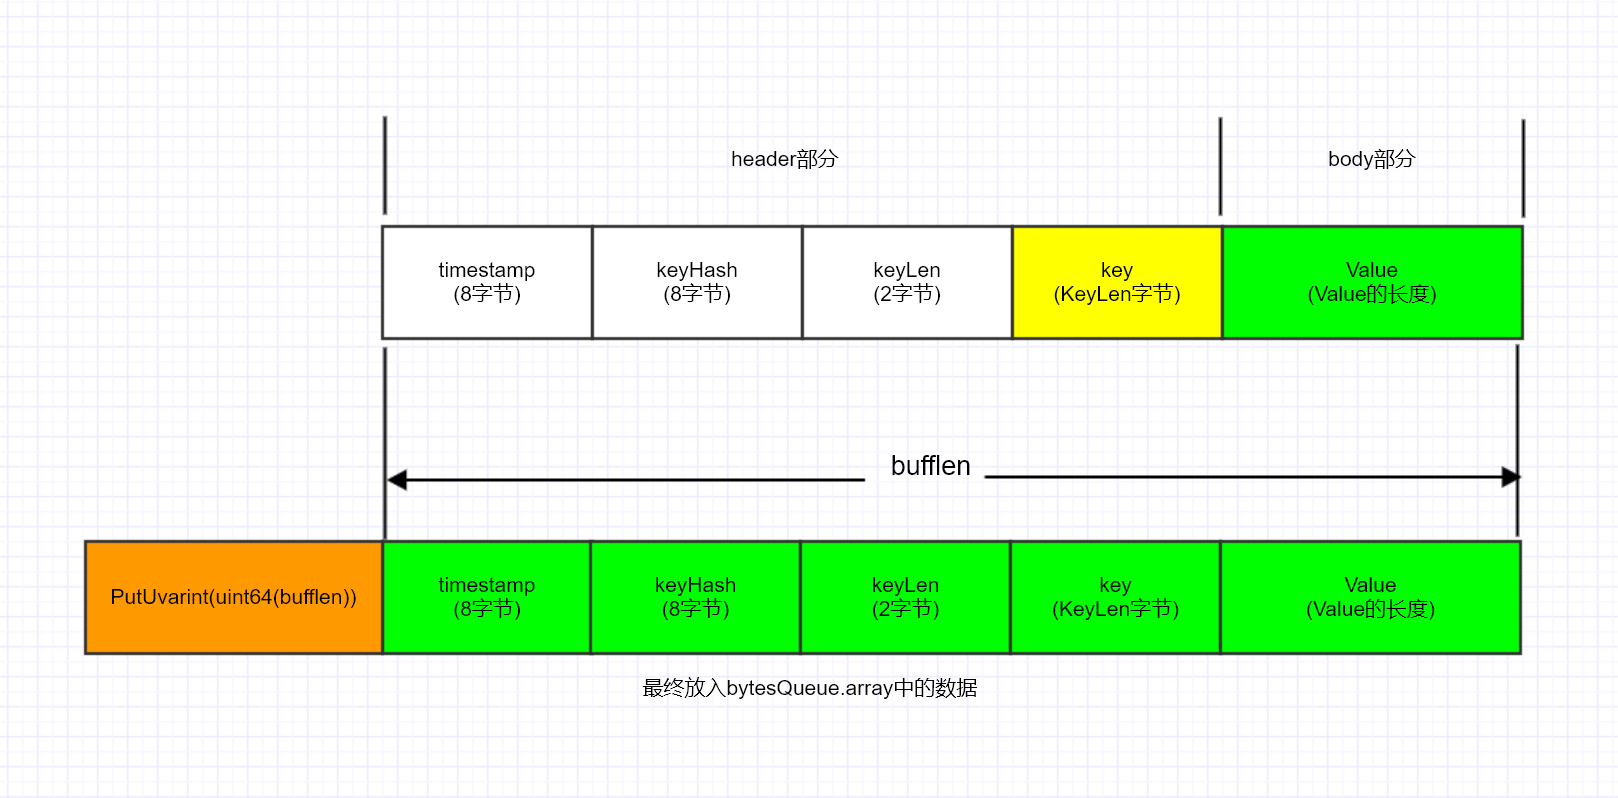
最终是通过 binary.PutUvarint + BytesQueue.copy 方法,将 pack 后的数据及长度写入到 bytesQueue.array 中
binary.PutUvarint,该方法主要是将 uint64 类型放入 buf 中,并返回写入的字节数。如果 buf 过小,PutUvarint 将抛出 panic。
func (q *BytesQueue) push(data []byte, len int) {
    // 得到 binary 的长度(uint64(len))
    // 其中 len 为 pack 后的数据长度
    headerEntrySize := binary.PutUvarint(q.headerBuffer, uint64(len))
    // 复制长度
	q.copy(q.headerBuffer, headerEntrySize)
    // 复制 pack 后的数据
	q.copy(data, len)

	if q.tail > q.head {
		q.rightMargin = q.tail
	}
	if q.tail == q.head {
		q.full = true
	}

	q.count++
}

func (q *BytesQueue) copy(data []byte, len int) {
	q.tail += copy(q.array[q.tail:], data[:len])
}
关于 bigCache 的数据序列化存储可参见下图:
0x03 核心数据结构
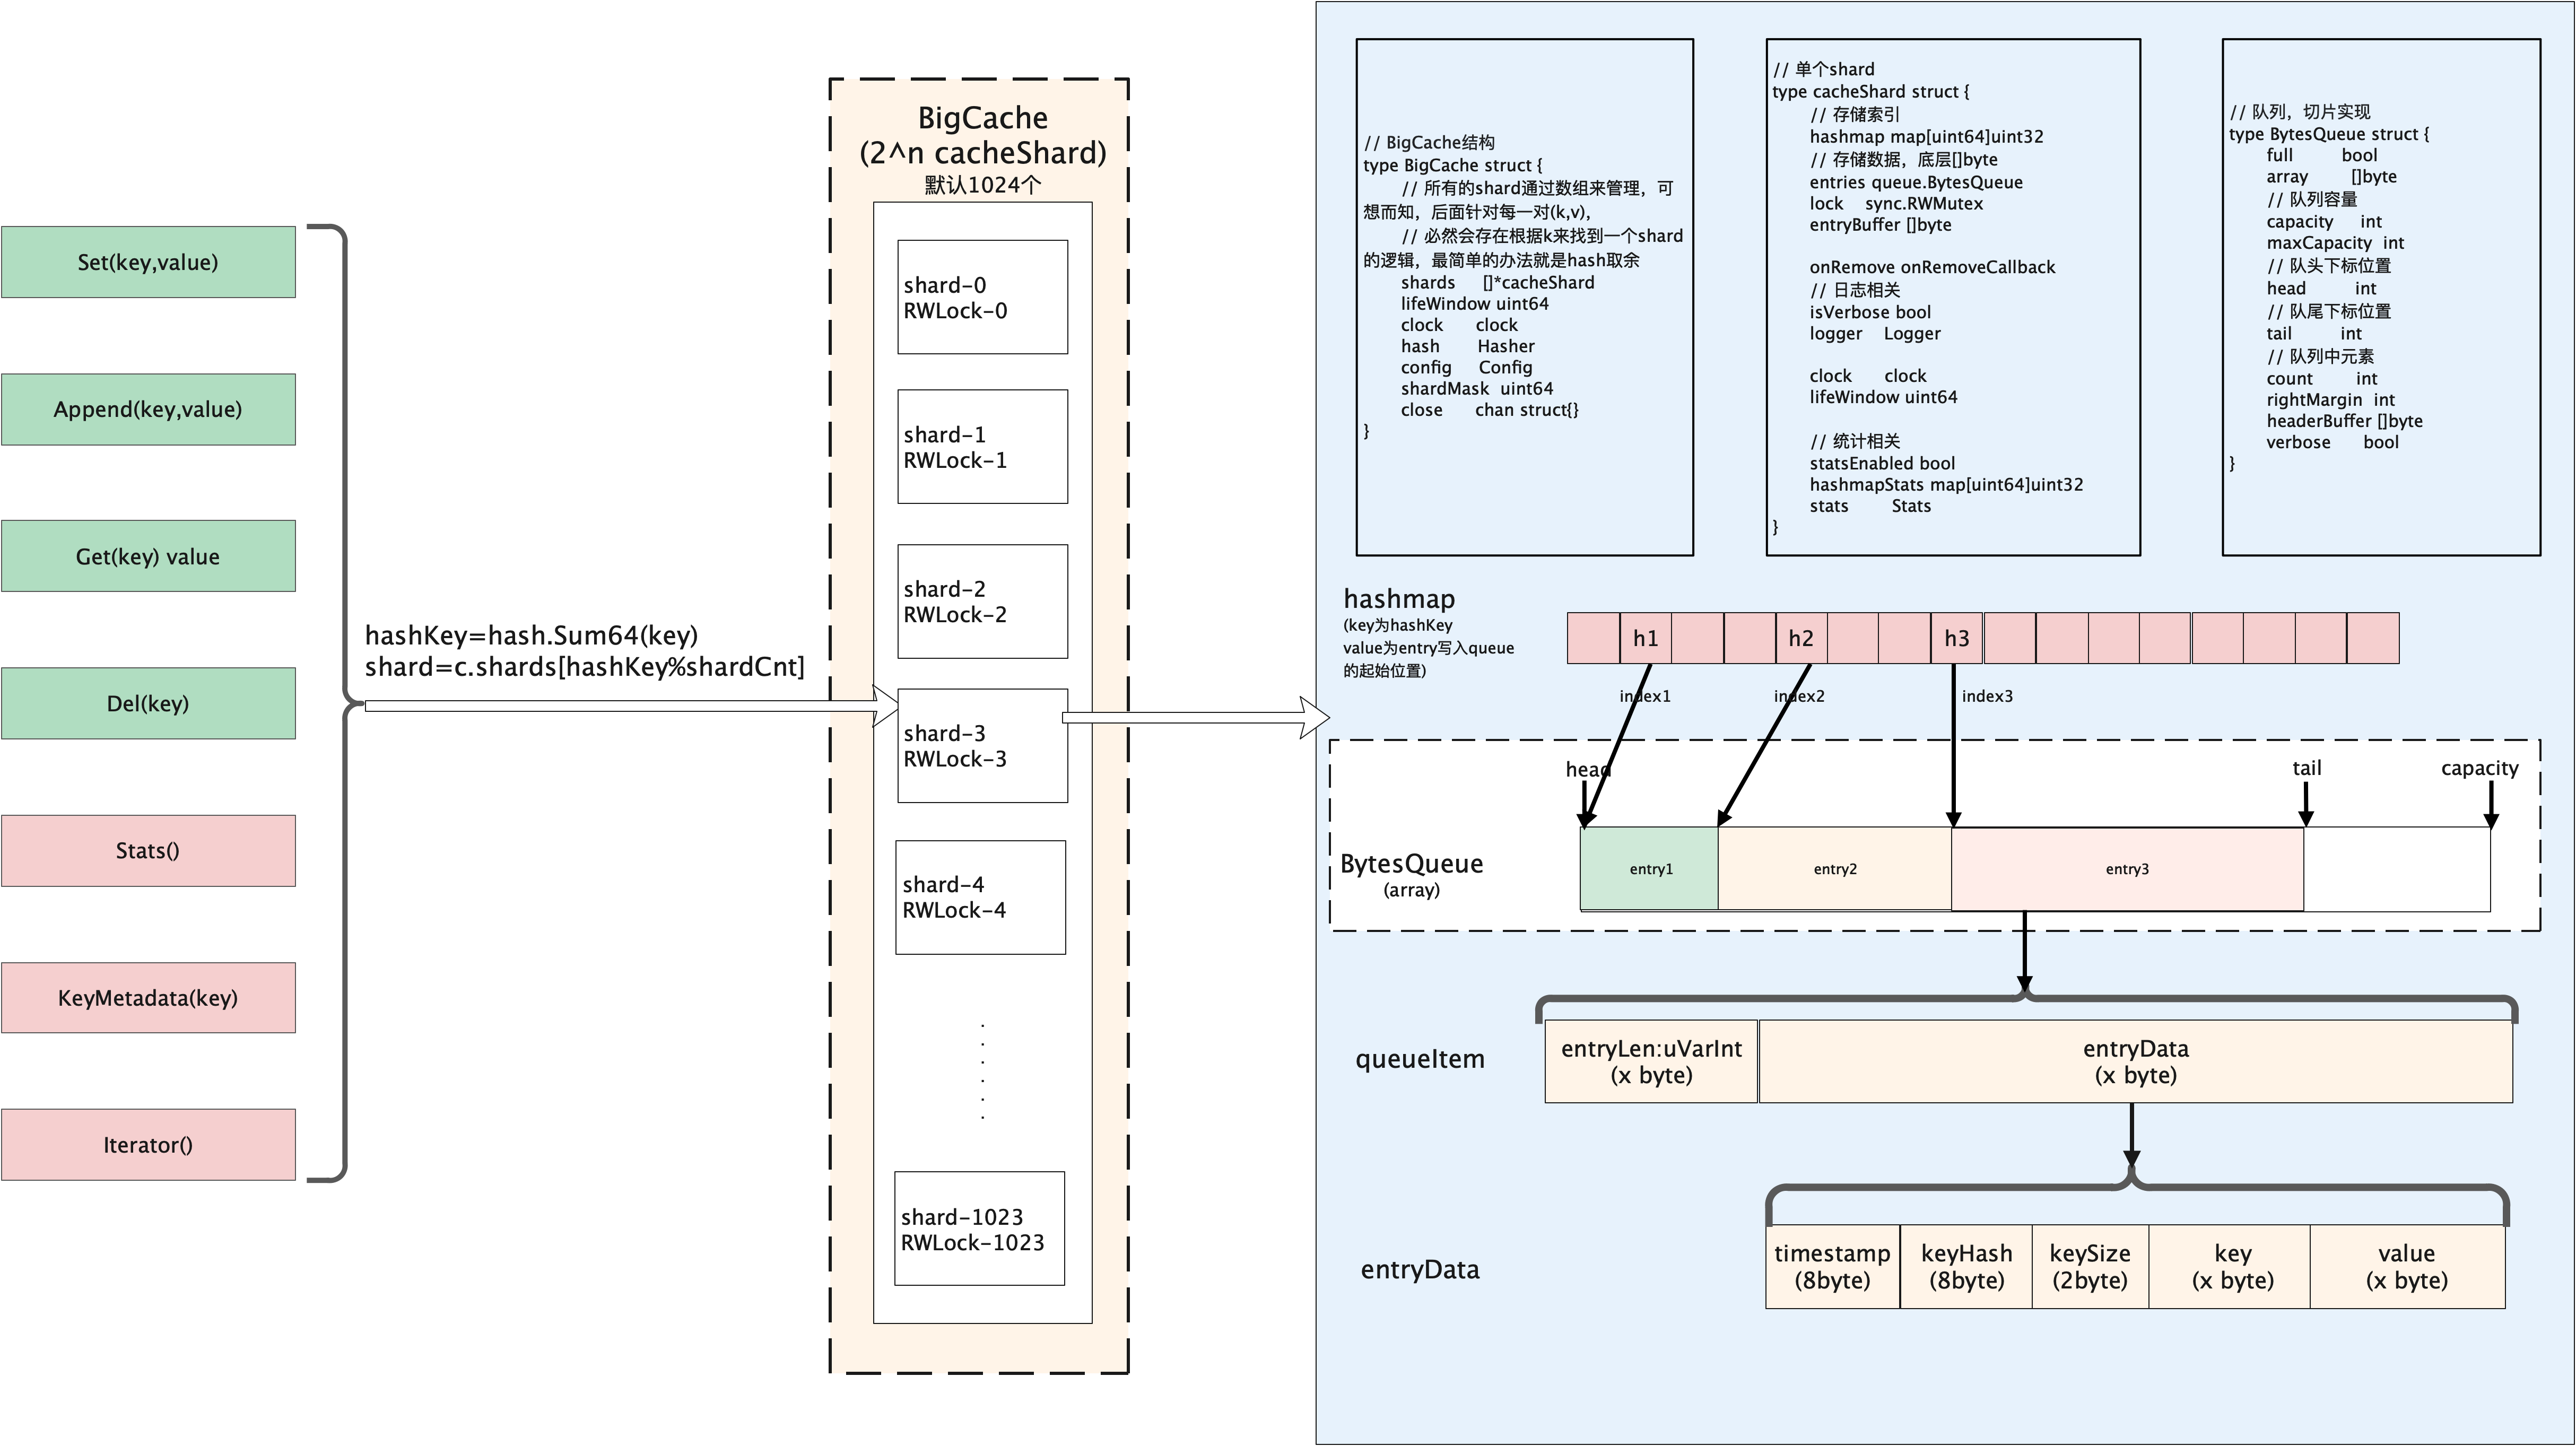
bigCache 的核心数据结构如下图所示:
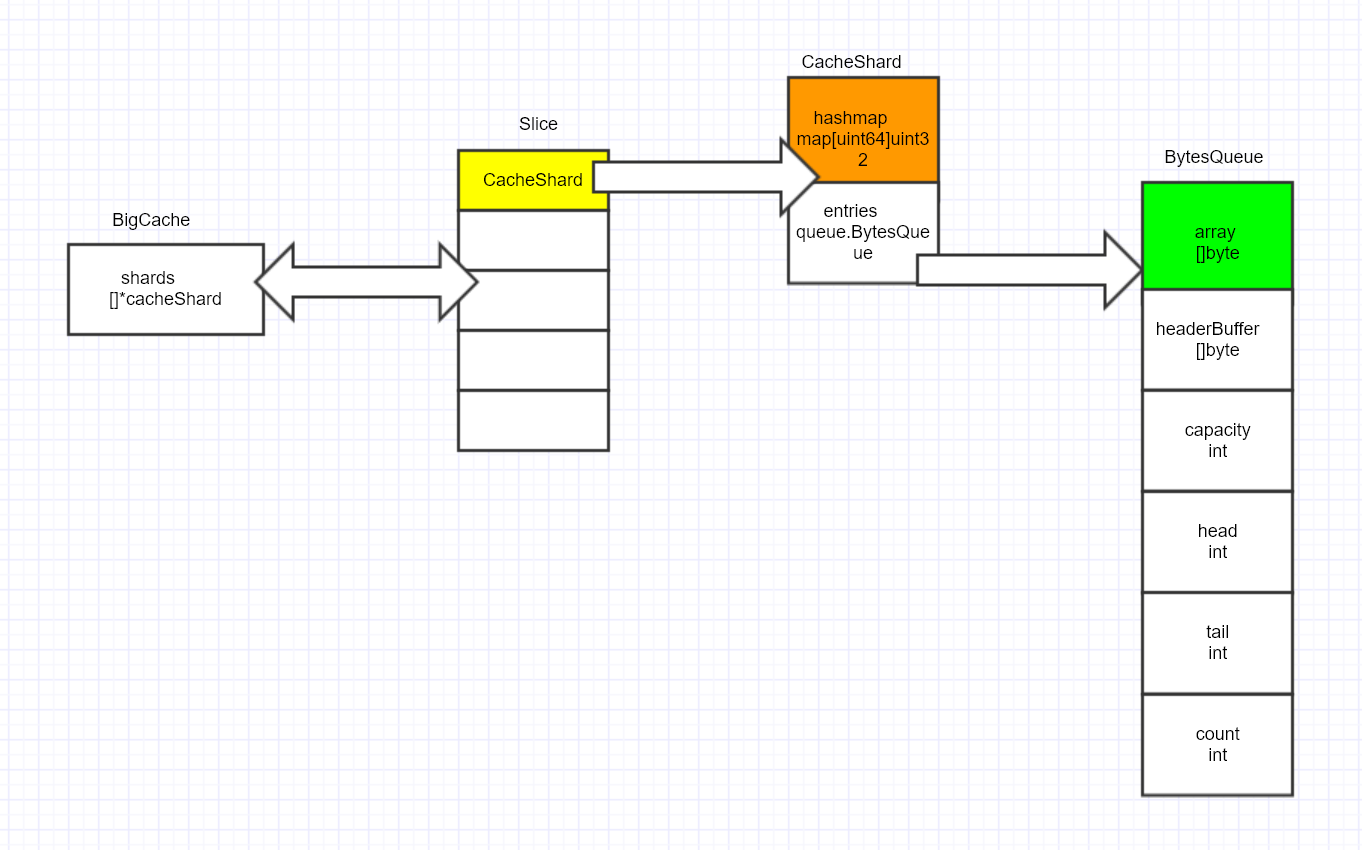
bigCache:管理节点cacheShard:分段(shard)缓存BytesQueue:核心的存储结构,真正的数据以二进制序列化后存储的位置
BytesQueue结构
每个cacheShard都包含了一个queue.BytesQueue,方便起见,上图将BytesQueue的结构单独画出来(并非指针)
type cacheShard struct {
	//...
	hashmap     map[uint64]uint32
	entries     queue.BytesQueue
	lock        sync.RWMutex
	entryBuffer []byte
	//...
}
所有的用户 value(也包含了 key) 都保存在一个 BytesQueue 里,然后保存这个 value 的头部所在的索引值, 通过索引值来访问(索引值为 uint32 类型),这样在 BigCache 中,核心的映射关系就使用每个cacheShard的成员 hashmap map[uint64]uint32 来存储了,这样既不存储指针,也不存储复合结构,使得 GC 对 bigCache 的影响降到最小。
每一个缓存分片 cacheShard 里都会有一个 map[uint64]uint32 来保存 hash(key) ==> valueIndex 的关系, 并且每个 cacheShard 里都会有一个 BytesQueue 来储存 value(实际上数据是存储在BytesQueue.array中)
BigCache的实现和之前在公司看过的一种索引和数据分离的多阶hash的实现很相似。主索引(多阶hash数组)的value保存的是在数据段的位置,通过二次定位拿到某个key对应的真实的value。
// BytesQueue is a non-thread safe queue type of fifo based on bytes array.
// For every push operation index of entry is returned. It can be used to read the entry later
type BytesQueue struct {
	full            bool
	array           []byte      // 真正存储数据的地方
	capacity        int			// array 的容量
	maxCapacity     int			// array 可申请的最大容量
	head            int
	tail            int 		// 下次可以插入 item 的位置
	count           int			// 当前插入的 item 数量
	rightMargin     int
	headerBuffer    []byte		// 插入前做临时 buffer 所用(slice-copy)
	verbose         bool        // 打印 log 开关
	initialCapacity int			// BytesQueue 创建时,array 的初始容量
}
在 bigCache 中,所有的 value 都是存在一个 BytesQueue 中的,从实现可知,所有的用户存储数据经由序列化后存入 array []byte,有点像 TLV + RingBuffer 的实现(不完全是)。
下面章节就这 3 种数据结构实现及接口调用过程来分析。我们先从 BytesQueue 开始。
0x04 BytesQueue 实现
前文说到,BytesQueue 是 bigCache 的真正存储。通过维护下面几个变量来实现存储位移及标识:
head:起始位置(也可以理解为,当前最老的数据的位置,删除的逻辑从这个位置开始)tail:下次可以插入 item 的位置capacity:标识array的容量count:当前已经插入的 item 的数量maxCapacity:标识array可以申请的最大容量rightMargin:用于标识队列中最后一个元素的位置,是一个绝对位置。leftMarginIndex:常量,值为1,标识队列的开头位置(0号不用)
注意, head 和 tail 以及 rightMargin 的初始值都是 leftMarginIndex。BytesQueue 使用 []byte 类型来模拟队列,插入数据从 tail 位置,删除数据从 head 位置。有些像低配版本的 bytes.Buffer。
1、当插入 item 时,tail 累加,见 bytesQueue.copy 方法:
func (q *BytesQueue) copy(data []byte, len int) {
	q.tail += copy(q.array[q.tail:], data[:len])
}
2、当删除 item 时(注意:这里删除的 item 的场景和我们通常的 Cache 实现不一样,这里指删除开头的最老的、过期的节点),head 累加,见 bytesQueue.Pop 方法:
//Pop reads the oldest entry from queue and moves head pointer to the next one
func (q *BytesQueue) Pop() ([]byte, error) {
	data, headerEntrySize, err := q.peek(q.head)
	if err != nil {
		return nil, err
	}
	size := len(data)

	q.head += headerEntrySize + size
	q.count--

	if q.head == q.rightMargin {
		q.head = leftMarginIndex
		if q.tail == q.rightMargin {
			q.tail = leftMarginIndex
		}
		q.rightMargin = q.tail
	}

	q.full = false

	return data, nil
}
3、注意:head 和 tail 都是相对位置,head 不一定一直在 tail 的前面,比如随着数据的插入,tail 已处于 BytesQueue.array 的最后面,此时 bigCache 会尝试从 head 前面查找是否还有可以插入的位置,如果插入成功,则 head 就会在 tail 的后面,如下图所示:
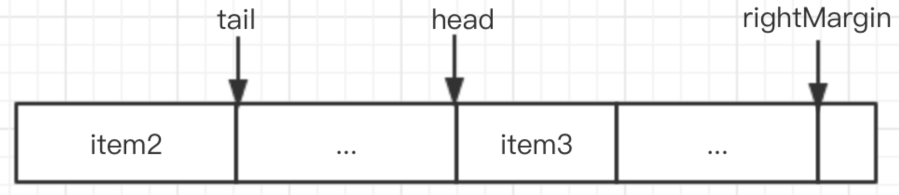
4、BytesQueue 不同于队列,head 所指向的元素不一定是最早插入的元素,tail 指向的元素也不是最晚插入 BytesQueue 的,它们可能会因为扩容是发生变化。因此它们的作用不是用来判断数据的新旧程度,而是用来判断是否可以插入新的元素,判断数据是否过期是使用的元素中的 timestamp 字段。
5、每次插入 item 时,bigCache 会根据插入的 key 和 value 在 BytesQueue 结构申请固定大小的空间。key 和 value 都会被写入到 array 中
6、BytesQueue 实现了如下对外接口:
ResetPushPopPeekCapacityLen
Push方法
BytesQueue.Push方法
0x05 bigCache && cacheShard 分片
针对并发降低锁粒度而做的分片 shard 优化,已经是 Golang 的常用套路了。为了避免协程并发访问,单个锁成为系统的瓶颈,bigCache 亦采用 shards 的方式来解决:它将全部要存储的数据划分成若干个 shard 独立管理,而每一个 shard 都拥有一个锁,这样每个锁只负责一部分的数据,这样能够减少并发读写对 sync.RWMutex 的调用。
type BigCache struct {
    shards       []*cacheShard	// 分片结构,每一个 cacheShard 中都有一个读写锁
    lifeWindow   uint64 // 数据过期时间
    clock        clock  // 获取数据存储时的时间戳
    hash         Hasher // 计算请求数据 key 的 hash 值(通用方法)
    config       Config
    shardMask    uint64 //len(shards) - 1,必须为 2 的次幂
    maxShardSize uint32 // 每个 shard 中 byte 数组的最大容量
    close        chan struct{}
}
再看看 cacheShard 结构,单个 shard 的 结构 如下:
type cacheShard struct {
	hashmap     map[uint64]uint32
	// 存储数据在 entries 中具体位置, key 为数据 key 的 hash,value 为位置(key -> value index)
	entries     queue.BytesQueue		// 数据最终存储的位置
	lock        sync.RWMutex
	entryBuffer []byte
	onRemove    onRemoveCallback	 // 删除数据时提供的回调函数

	isVerbose    bool
	statsEnabled bool
	logger       Logger
	clock        clock
	lifeWindow   uint64

	hashmapStats map[uint64]uint32
	stats        Stats
}
这里注意看 cacheShard 中的 hashmap 结构,其类型为 map[uint64]uint32,完全和 string 扯不上关系。有经验的开发者一眼就看出这其实是个索引,hashmap 的 key 为用户 key 的 hash 值,hashmap 的 value 则指向存储部分的位置(有点像多级 hashtable + ringQueue 的经典存储结构)。
所有的用户 value(其实也包含了用户 key) 都保存在一个 BytesQueue 里 , 然后保存这个 value 的头部所在的索引值, 通过索引值来访问(索引值为 uint32 类型),这样在 bigCache 中,核心的映射关系就使用一个 map[uint64]uint32 来存储了,这样即不存储指针,也不存储符合结构,使得 gc 对 bigCache 的影响降到最小。
每一个缓存分片 cacheShard 里都会有一个 map[uint64]uint32 来保存 hash(key) ==> valueIndex 的关系, 并且每个 cacheShard 里都会有一个 BytesQueue 来储存 value。
cacheShard提供的方法
1、查询
2、Set方法
set方法
3、删除方法
0x06 bigCache 对外接口
本小节,我们看下 bigCache 的数据操作过程。 BigCache 对外提供了如下接口:
1、bigCache.Get:获取数据
2、bigCache.Set:插入数据
插入数据时,若发现key已存在,并不会覆盖原来数据,而是将原数据置为无效,再将新数据插入;此目的有二:
- 因为
[]byte类型的value在queue中的长度固定,新插入的数据和原来的长度未必相等 - 判断过期以及存储不足时,是从queue头部开始的,如果覆盖老数据,则这个数据较新,但是位置靠前,可能造成queue数据一直不会过期
3、bigCache.Delete:删除数据
bigCache删除数据的思路和普通的 Cache 很不一样,删除操作Delete并不直接删除数据,而是删除 cacheShard.hashmap 中的 key,然后将数据部分(data[timestampSizeInBytes:])置为 0(见resetKeyFromEntry方法),并没有归还内存。
此外,bigCache 可以为插入的数据设置过期时间,bigCache 中自动删除数据有2种场景:
- 在插入数据时删除过期数据(为了不影响插入性能,每次最多删除一条数据,实现在此)
- 通过设置
CleanWindow的值,启动 goroutine 后台定时批量删除过期数据(注意:bigCache 的缺点是所有数据的过期时间都是一样的,需要注意缓存失效的问题)
代码分析
实现代码如下,由于 bigCache 采用 Shared 的方式进行存储,因此无论增加、删除或者查找操作,都需要先用 key 查找在哪一个 cacheShard 上再操作。
func (c *BigCache) Get(key string) ([]byte, error) {
	hashedKey := c.hash.Sum64(key) // string -> uint64
	shard := c.getShard(hashedKey) // 获取 key 所在的 shard 位置
	return shard.get(key, hashedKey)
}

// Set saves entry under the key
func (c *BigCache) Set(key string, entry []byte) error {
	hashedKey := c.hash.Sum64(key)
	shard := c.getShard(hashedKey)
	return shard.set(key, hashedKey, entry)
}

// Delete removes the key
func (c *BigCache) Delete(key string) error {
	hashedKey := c.hash.Sum64(key)
	shard := c.getShard(hashedKey)
	return shard.del(key, hashedKey)
}

//getShard 方法:通过 `hashedKey` 获取数据存储到哪一个 `shard 中
func (c *BigCache) getShard(hashedKey uint64) (shard *cacheShard) {
	return c.shards[hashedKey&c.shardMask]
}
下面单独分析各个接口。
插入数据 bigCache.Set
再看下插入 item 的逻辑,到底在 cacheShard 上执行了哪些操作?首先是 BigCache.Set 方法:
// Set saves entry under the key
func (c *BigCache) Set(key string, entry []byte) error {
    hashedKey := c.hash.Sum64(key)
    shard := c.getShard(hashedKey)
    return shard.set(key, hashedKey, entry)
}
再看下 cacheShard.set 的实现逻辑(由于 cacheShard 中的 hashmap 存放 value 在 BytesQueue 中具体位置,所以我们要做的事情就是寻找到这个位置并插入 item):
- 首先根据 key 的
hashedKey在cacheShard.hashmap中进行冲突检测,检测hashmap中此 key 是不是已经存在,如果发现 key 已经存在,bigCache 会将之前插入 item 的hashKey字段(通过s.entries.Get(int(previousIndex))方法获取到之前插入 item 的位置引用,[]byte类型)置为 0,即resetKeyFromEntry的逻辑 - 每次插入新数据时,bigCache 都会获取
BytesQueue头部数据,然后判断数据是否过期,如果过期则删除,这也是个很不错的设计考虑 - 使用
wrapEntry对用户传入的 key 和 value 进行序列化 - 序列化完成后,调用
BytesQueue.Push方法插入此binary数据 - 在插入数据时,如果插入失败了,bigCache 会将
BytesQueue的头部数据删除掉,尝试通过删除已插入的数据来解决因BytesQueue存储不足而插入失败的情况,然后重新尝试BytesQueue.Push操作(for循环)。如果再次失败了,bigCache 会继续尝试,直到 bigCache 中已无可删除的数据了为止 - 数据插入成功后,在
hashmap存储这个index位置
func (s *cacheShard) set(key string, hashedKey uint64, entry []byte) error {
    currentTimestamp := uint64(s.clock.epoch())
    s.lock.Lock()
    // 冲突检测
    if previousIndex := s.hashmap[hashedKey]; previousIndex != 0 {
        if previousEntry, err := s.entries.Get(int(previousIndex)); err == nil {
            resetKeyFromEntry(previousEntry)
        }
    }
    // 每次插入时,都会检查
    // 删除队列头部的过期数据
    if oldestEntry, err := s.entries.Peek(); err == nil {
        s.onEvict(oldestEntry, currentTimestamp, s.removeOldestEntry)
    }

    // pack key 和 value
    w := wrapEntry(currentTimestamp, hashedKey, key, entry, &s.entryBuffer)

    // 这里是个 for 循环
    for {
        if index, err := s.entries.Push(w); err == nil {
            s.hashmap[hashedKey] = uint32(index)    // 插入成功!最终 hashmap 中保存的是 index
            // 即插入前 q.tail 的位置
            s.lock.Unlock()
            return nil
        }
        // 在插入数据时,如果插入失败了,bigCache 会将 BytesQueue 的头部数据删除掉,尝试通过删除已插入的数据来解决因 BytesQueue 存储不足而插入失败的情况,然后重新尝试 push 操作。如果再次失败了,bigCache 会继续尝试,直到 bigCache 中已无可删除的数据了为止。
        if s.removeOldestEntry(NoSpace) != nil {
            s.lock.Unlock()
            return fmt.Errorf("entry is bigger than max shard size")
        }
    }
}
最后,再看下 bytesQueue.Push 的实现,它首先去 BytesQueue 尾部查找是否有空闲空间(canInsertAfterTail 方法),然后去 BytesQueue 头部查看是否有删除数据后留下的空间(canInsertBeforeHead 方法),如果上面两者都没有,则尝试通过扩容的方式来解决。如果通过扩容的方式依然不能解决 BytesQueue 内存不足的问题,则通过上面提到的删除数据的方式解决,这时就会出现新数据把旧数据覆盖掉的情形。
// Push copies entry at the end of queue and moves tail pointer. Allocates more space if needed.
// Returns index for pushed data or error if maximum size queue limit is reached.
func (q *BytesQueue) Push(data []byte) (int, error) {
	dataLen := len(data)
	headerEntrySize := getUvarintSize(uint32(dataLen))

	if !q.canInsertAfterTail(dataLen + headerEntrySize) {
		if q.canInsertBeforeHead(dataLen + headerEntrySize) {
			q.tail = leftMarginIndex
		} else if q.capacity+headerEntrySize+dataLen >= q.maxCapacity && q.maxCapacity > 0 {
			return -1, &queueError{"Full queue. Maximum size limit reached."}
		} else {
            // 尝试扩容,这里性能可能会受影响
			q.allocateAdditionalMemory(dataLen + headerEntrySize)
		}
	}

    // 插入的位置(保存插入前的位置)
	index := q.tail

	q.push(data, dataLen)

	// 返回 index,hashmap 保存的正是此位置
	return index, nil
}

// canInsertAfterTail returns true if it's possible to insert an entry of size of need after the tail of the queue
func (q *BytesQueue) canInsertAfterTail(need int) bool {
	if q.full {
		return false
	}
	if q.tail >= q.head {
		return q.capacity-q.tail >= need
    }
    // 当 q.tail 小于 q.head 时,分为下面几种情况
	// 1. there is exactly need bytes between head and tail, so we do not need
	// to reserve extra space for a potential empty entry when realloc this queue
	// 2. still have unused space between tail and head, then we must reserve
	// at least headerEntrySize bytes so we can put an empty entry
	return q.head-q.tail == need || q.head-q.tail >= need+minimumHeaderSize
}


// canInsertBeforeHead returns true if it's possible to insert an entry of size of need before the head of the queue
func (q *BytesQueue) canInsertBeforeHead(need int) bool {
	if q.full {
		return false
	}
	if q.tail >= q.head {
		return q.head-leftMarginIndex == need || q.head-leftMarginIndex >= need+minimumHeaderSize
	}
	return q.head-q.tail == need || q.head-q.tail >= need+minimumHeaderSize
}
一个常用的技巧:在插入时删除过期数据
removeOldestEntry方法是删除一条过期(最久)的数据,这里简单分析下其实现:
func (s *cacheShard) removeOldestEntry(reason RemoveReason) error {
	oldest, err := s.entries.Pop()
	if err == nil {
		hash := readHashFromEntry(oldest)
		if hash == 0 {
			// entry has been explicitly deleted with resetKeyFromEntry, ignore
			return nil
		}
		delete(s.hashmap, hash)
		s.onRemove(oldest, reason)
		if s.statsEnabled {
			delete(s.hashmapStats, hash)
		}
		return nil
	}
	return err
}
为何BytesQueue.Pop能获取到最久的数据呢?
删除数据 bigCache.Delete
删除的操作和我们通常实现 Cache 的不太一样,bigCache 删除数据的流程如下:
// Delete removes the key
func (c *BigCache) Delete(key string) error {
 	hashedKey := c.hash.Sum64(key)
 	shard := c.getShard(hashedKey)
 	return shard.del(hashedKey)
}
cacheShard.del 的实现如下,首先检查 hashedKey 是否存在于 cacheShard 的 hashmap 中,如果 hashmap 对应的 key 存在,则删除 hashmap 的 key,然后使用 resetKeyFromEntry 方法将数据的 hashKey 部分置为 0。当然,这不会真正的归还内存,只是在数据存储区域做了删除标记而已。
func (s *cacheShard) del(key string, hashedKey uint64) error {
    s.lock.RLock()
    itemIndex := s.hashmap[hashedKey]
    if itemIndex == 0 {
        s.lock.RUnlock()
        s.delmiss()
        return notFound(key)
    }
    wrappedEntry, err := s.entries.Get(int(itemIndex))
    if err != nil {
        s.lock.RUnlock()
        s.delmiss()
        return err
    }
    s.lock.RUnlock()

    s.lock.Lock()
    {
        delete(s.hashmap, hashedKey)
        s.onRemove(wrappedEntry, Deleted)
        resetKeyFromEntry(wrappedEntry)
    }
    s.lock.Unlock()
    return nil
}
查询数据 bigCache.Get
bigCache.Get 查询方法的步骤为:
- 根据
fnv算法计算出用户 key 的hash值hashedKey getShard方法:通过hashedKey获取数据存储到哪一个shard中- 调用
shard的get方法获取存储的数据
查找方法的调用链为BigCache.getShard ==> cacheShard.get ==> BytesQueue.get,代码如下:
// Get reads entry for the key.
// It returns an ErrEntryNotFound when
// no entry exists for the given key.
func (c *BigCache) Get(key string) ([]byte, error) {
	hashedKey := c.hash.Sum64(key)
	shard := c.getShard(hashedKey)
	return shard.get(key, hashedKey)
}

//根据uint64的key值获取shard分片index
func (c *BigCache) getShard(hashedKey uint64) (shard *cacheShard) {
	return c.shards[hashedKey&c.shardMask]
}

func (s *cacheShard) get(key string, hashedKey uint64) ([]byte, error) {
	//shard加锁
    s.lock.RLock()

    //getWrappedEntry 先根据s.hashmap查询到itemIndex,itemIndex即是key保存在byteQueue的array中的位置
	wrappedEntry, err := s.getWrappedEntry(hashedKey)
	if err != nil {
		s.lock.RUnlock()
		return nil, err
	}

	//解码原始数据,先严格检查key是否与value中保存的是否一致
	if entryKey := readKeyFromEntry(wrappedEntry); key != entryKey {
		// hash发生了冲突,有概率发生
		s.lock.RUnlock()
		s.collision()
		if s.isVerbose {
			s.logger.Printf("Collision detected. Both %q and %q have the same hash %x", key, entryKey, hashedKey)
		}
		return nil, ErrEntryNotFound
	}
	//解码原始数据
	entry := readEntry(wrappedEntry)
	s.lock.RUnlock()

	//查询命中计数
	s.hit(hashedKey)

	return entry, nil
}

func (s *cacheShard) getWrappedEntry(hashedKey uint64) ([]byte, error) {
	//查询key在byteQueue中的位置
	itemIndex := s.hashmap[hashedKey]

    // 未找到
	if itemIndex == 0 {
		s.miss()
		return nil, ErrEntryNotFound
	}

    //itemIndex 是索引(注意itemIndex是uint32类型)
	wrappedEntry, err := s.entries.Get(int(itemIndex))
	if err != nil {
		s.miss()
		return nil, err
	}

	return wrappedEntry, err
}
s.entries.Get(int(itemIndex)) 的实现如下,index 是数据区域的存储下标,先拿到 blockSize 即存储数据的长度,那么 q.array[index+headerEntrySize:index+headerEntrySize+blockSize] 就是待查询的序列化数据:
// Get reads entry from index
func (q *BytesQueue) Get(index int) ([]byte, error) {
    data, _, err := q.peek(index)
    return data, err
}

func (q *BytesQueue) peek(index int) ([]byte, int, error) {
    if q.count == 0 {
        return nil, 0, &queueError{"Empty queue"}
    }

    if index <= 0 {
        return nil, 0, &queueError{"Index must be grater than zero. Invalid index."}
    }

    if index+headerEntrySize >= len(q.array) {
        return nil, 0, &queueError{"Index out of range"}
    }

    blockSize := int(binary.LittleEndian.Uint32(q.array[index : index+headerEntrySize]))
    return q.array[index+headerEntrySize : index+headerEntrySize+blockSize], blockSize, nil
}
bigCache 定时删除逻辑
bigCache 可以为插入的数据设置过期时间,但是缺点是所有数据的过期时间都是一样的。bigCache 中自动删除数据有两种场景:
- 在插入数据时删除过期数据(为了不影响插入性能,每次最多删除一条数据,前文已描述)
- 通过设置
CleanWindow,启动 goroutine 后台定时批量删除过期数据
...
if config.CleanWindow > 0 {
    go func() {
        ticker := time.NewTicker(config.CleanWindow)
        defer ticker.Stop()
        for {
            select {
            case t := <-ticker.C:
                cache.cleanUp(uint64(t.Unix()))
            case <-cache.close:
                return
            }
        }
    }()
}
...
真正执行删除的逻辑比较简单,就是遍历各个 cacheShard,从 q.head 的位置(这个位置指向的数据必定是最先插入的)开始检查,如果有超时的 item 就直接删除:
func (c *BigCache) cleanUp(currentTimestamp uint64) {
	for _, shard := range c.shards {
		shard.cleanUp(currentTimestamp)
	}
}

func (s *cacheShard) cleanUp(currentTimestamp uint64) {
	s.lock.Lock()
	for {
		if oldestEntry, err := s.entries.Peek(); err != nil {
			break
		} else if evicted := s.onEvict(oldestEntry, currentTimestamp, s.removeOldestEntry); !evicted {
			break
		}
	}
	s.lock.Unlock()
}

// Peek reads the oldest entry from list without moving head pointer
func (q *BytesQueue) Peek() ([]byte, error) {
	data, _, err := q.peek(q.head)
	return data, err
}
0x07 bigCache 扩容
BytesQueue 初始化时会设置 maxCacacity,而真正用来存数据的数组会先初始化到一个比较小的值,在使用的过程中动态扩容. 每次扩容的容量都是前一次的 2 倍(直到最大 size)
注意下面代码中的 rightMargin,用于标识队列中最后一个元素的位置,是一个绝对位置,当队列需要扩容时,会 copy 该位置之前的所有元素。
func (q *BytesQueue) allocateAdditionalMemory(minimum int) {
    start := time.Now()
    if q.capacity < minimum {
        q.capacity += minimum
    }
    q.capacity = q.capacity * 2
    if q.capacity > q.maxCapacity && q.maxCapacity > 0 {
        q.capacity = q.maxCapacity
    }
    oldArray := q.array
    q.array = make([]byte, q.capacity)
    if leftMarginIndex != q.rightMargin {
        copy(q.array, oldArray[:q.rightMargin])
        if q.tail < q.head {
            emptyBlobLen := q.head - q.tail - headerEntrySize
            q.push(make([]byte, emptyBlobLen), emptyBlobLen)
            q.head = leftMarginIndex // head 指向了后插入的数据
            q.tail = q.rightMargin
        }
    }
}
0x08 其他细节
fnv 算法
bigCache 在计算 hash(key) 时, 使用的是 FNV 算法。这个算法有两个优点:
- 所有操作均在栈上进行,节省内存
- 效率较高
- 适合
string到uint64的 hash 转换
type fnv64a struct{}

const (
	// offset64 FNVa offset basis. See https://en.wikipedia.org/wiki/Fowler–Noll–Vo_hash_function#FNV-1a_hash
	offset64 = 14695981039346656037
	// prime64 FNVa prime value. See https://en.wikipedia.org/wiki/Fowler–Noll–Vo_hash_function#FNV-1a_hash
	prime64 = 1099511628211
)

// Sum64 gets the string and returns its uint64 hash value.
func (f fnv64a) Sum64(key string) uint64 {
	var hash uint64 = offset64
	for i := 0; i <len(key); i++ {
		hash ^= uint64(key[i])
		hash *= prime64
	}

	return hash
}
fnv 冲突的处理
这里有个问题,在计算用户 key 的 hash 值时,结果冲突了如何处理?从 bigCache 的处理看,也是容忍了这样的操作,直接返回失败:
//...
// 从序列化的存储中抽取 key 并比较
if entryKey := readKeyFromEntry(wrappedEntry); key != entryKey {
	if s.isVerbose {
		s.logger.Printf("Collision detected. Both %q and %q have the same hash %x", key, entryKey, hashedKey)
	}
	s.lock.RUnlock()
	s.collision()
	return nil, ErrEntryNotFound
}
//...
bigCache 数据更新
bigCache 为何不提供更新的操作?其实这是显而易见的
每次插入元素,bigCache 会根据插入的 key 和 value 在 BytesQueue 中申请一个固定大小的空间。因为无法保证更新的 value 值和旧的 value 长度相同(这也是数据定长存储的劣势),这样对 bigCache 来说,按照时间顺序的 head 和 tail 索引值会乱掉,所以干脆就不提供更新接口了。
0x09 总结 && 使用场景
从开源的实现来看,相较于 sync.Map,更多的作者更偏爱使用 shard map + RWMutex 实现缓存。下图厘清了bigcache的完整架构,from此文:
0x0A 一些重要的问题
注意,早期的版本,存在BUG,有如下的现象:
- 会报错
index out of range [7] with length 0 - 内存暴涨(怀疑内存泄漏 or goroutine泄漏)
- goroutine的数量会暴涨,很多goroutine都在等待bigcache内部的lock

原因是因为底层编码错误导致了panic,致使该shards内的lock没有释放,后面请求进来,一直在等待该锁(并发量越高,goroutine泄漏约严重);近期的版本修复了此问题,详细可见此。在gomod引用时,添加如下package:
go 1.12

require (
	github.com/allegro/bigcache/v3 v3.0.2-0.20211118104225-16df11e2ee38
)
BUG原因如下:
As #253 has pointed out, it is impossible to create an entry of arbitrary size in the byte queue. Basically, the problem is that at the points where the header gets larger, one number is skipped. This can lead to errors in the new allocation of a byte queue.

To solve this, the header size is included in the number that is encoded. This allows creating entries with arbitrary dimensions. For example, we have 127 bytes (1 header, 126 data), 128bytes (2 header, 126 data), and 129 bytes(2 header, 127 data).

As a benefit, we can reduce some calculations, and the code gets more straightforward.
The only downside is that the maximum entry size reduces from 4294967296 to 4294967291 bytes. In my belief, nothing too dramatic that gets in v3 with uint64, even a more minor problem.